Использование Facial Editor
Материал из CryWiki Russia
DCamer (Обсуждение | вклад) (Новая страница: «{{В процессе перевода|дата=1 сентября 2011|автор=1}} == Использование Facial Editor == === Введение === Эт...») |
DCamer (Обсуждение | вклад) |
||
| Строка 28: | Строка 28: | ||
[[Файл:Sandbox_FacialEditorRefUse_image003.jpg]] | [[Файл:Sandbox_FacialEditorRefUse_image003.jpg]] | ||
| - | Для поддержания | + | Для поддержания структуры библиотеки в чистоте, мы можем раскидать различные выражения по папкам. Чтобы создать таковую, щелкните правой кнопкой мыши по папке «root», которая по-умолчанию создаётся для каждого персонажа, и выберите «New Folder». |
[[Файл:Sandbox_FacialEditorRefUse_image004.jpg]] | [[Файл:Sandbox_FacialEditorRefUse_image004.jpg]] | ||
| Строка 50: | Строка 50: | ||
Это действие добавит морфы, имеют значение отличное от нуля под узлом выражения. | Это действие добавит морфы, имеют значение отличное от нуля под узлом выражения. | ||
| - | + | На правой стороне представления '''Expression Library''', находятся кривые, создаваемые для каждого морфа, которые были добавлены в выражение при его инициализации. Вес кривых визуализирует, насколько сильно влияет каждый морф на конечную форму персонажа. | |
| - | + | Щелчок правой кнопкой мыши по кривой позволяет изменить вес кривых или включить не-линейную или «сплайновую» интерполяцию. Сплайновая интерполяция даёт вам возможность добавлять ключи к кривой и изменять её влияние на весь диапазон собранного выражения. | |
| - | + | При этом вы можете имитировать нелинейные смешивания морфов, путем добавления «промежуточных» морф-целей и снижает необходимость представления каждого морфа в виде одной кривой в окне последовательности. | |
[[Файл:Sandbox_FacialEditorRefUse_image008.jpg]] | [[Файл:Sandbox_FacialEditorRefUse_image008.jpg]] | ||
| - | + | Фиолетовая линия представляет «нулевое» значение, когда выражение анимировано в окне последовательности, оная подходит к «1» на правой стороне или к «-1» на левой стороне. | |
In the example shown above, the «jaw_dropper_01» would have its strongest influence at a keyed value of «0.5» in the sequence view, going back to about 50 % when the expression has a keyed value of «1»;. | In the example shown above, the «jaw_dropper_01» would have its strongest influence at a keyed value of «0.5» in the sequence view, going back to about 50 % when the expression has a keyed value of «1»;. | ||
Версия 18:15, 4 сентября 2011
Статью пометил сам автор статьи.
Содержание |
Использование Facial Editor
Введение
Этот документ описывает начальный процесс создания головы в Facial Editor, и определение её выражений. Кроме того, он описывает настройку джойстика для более удобного создания анимаций.
Настройка головы
Загрузка персонажа
Первое что надо сделать, это загрузить персонажа в Facial Editor с помощью команды Character > Load в панели основных команд Facial Editor.
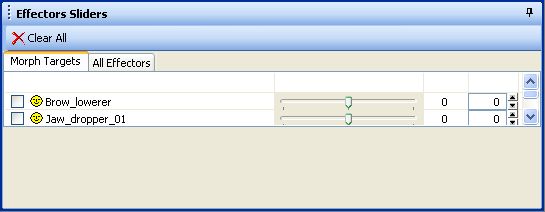
В окне Effectors Sliders находятся основные видимые морфы, которые были экспортированы из 3D-пакета.
В данном примере у нас два морфа; Brow_lowerer, и Jaw_dropper_01.
Не имеет значения, загрузите ли вы только голову персонажа, или же CDF-файл, в котором голова персонажа присоединена к нему, как кожное прикрепление.
Создание библиотеки выражение
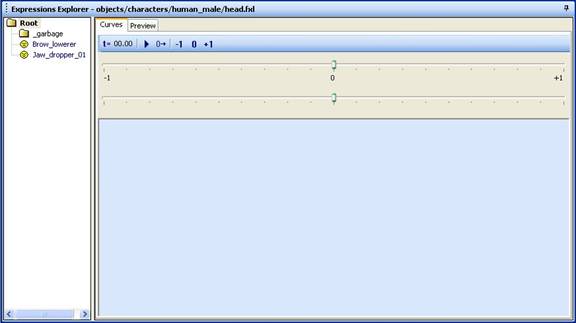
В окне Expression Explorer также показаны два доступного морфа. В верхней панели Expression Explorer, вы можете заметить, что у файла Expression Library уже есть имя, которое он автоматически получил при загрузки персонажа. Заметьте, данный файл в данный момент существует лишь в памяти, и его надо сохранить на жестком диске. Это можно сделать с помощью команды Expression Library->Save as…
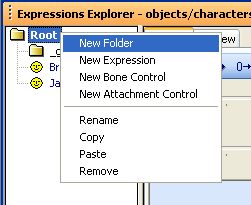
Для поддержания структуры библиотеки в чистоте, мы можем раскидать различные выражения по папкам. Чтобы создать таковую, щелкните правой кнопкой мыши по папке «root», которая по-умолчанию создаётся для каждого персонажа, и выберите «New Folder».
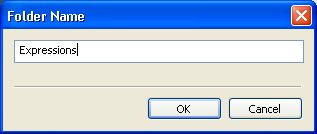
Введите желаемое имя в текстовом поле и нажмите «OK».
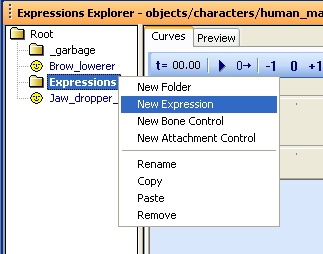
Щелчок правой кнопкой мыши по созданной папке, даст вам возможность создать новое выражение.
Введите для него название и нажмите «OK». Это создаст пустой контейнер, который будет содержать морфы, будучи его частью.
Для того, чтобы добавить морфы, определяющие выражение, переключиться на вид Effectors Sliders, и задайте ползунками из Morph Targets соответствующие значения. Чтобы начать с нуля, вы можете нажать кнопку «Clear All» в основной панели окна Effectors Sliders.
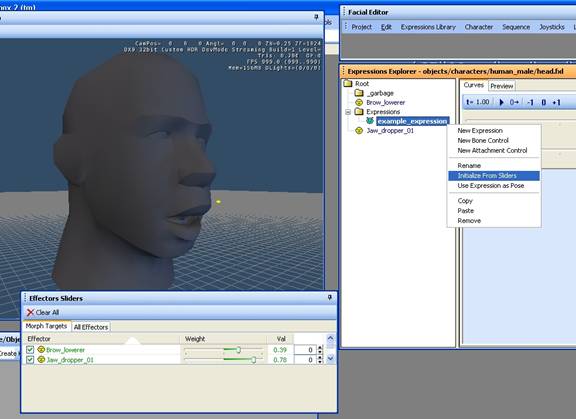
После завершения, щелкните правой кнопкой мыши по новому выражению в окне Expression Library, выберите «Initialize From Sliders» и подтвердите действие, нажав «Yes».
Это действие добавит морфы, имеют значение отличное от нуля под узлом выражения.
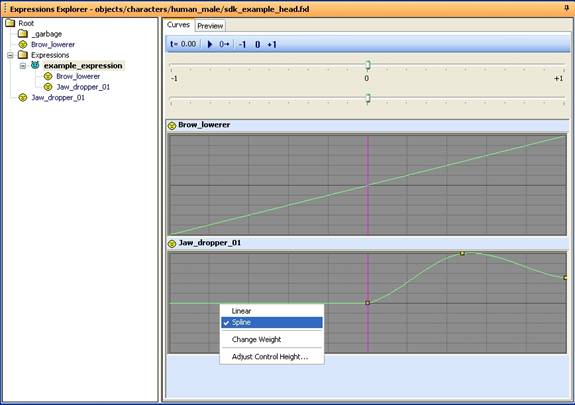
На правой стороне представления Expression Library, находятся кривые, создаваемые для каждого морфа, которые были добавлены в выражение при его инициализации. Вес кривых визуализирует, насколько сильно влияет каждый морф на конечную форму персонажа.
Щелчок правой кнопкой мыши по кривой позволяет изменить вес кривых или включить не-линейную или «сплайновую» интерполяцию. Сплайновая интерполяция даёт вам возможность добавлять ключи к кривой и изменять её влияние на весь диапазон собранного выражения. При этом вы можете имитировать нелинейные смешивания морфов, путем добавления «промежуточных» морф-целей и снижает необходимость представления каждого морфа в виде одной кривой в окне последовательности.
Фиолетовая линия представляет «нулевое» значение, когда выражение анимировано в окне последовательности, оная подходит к «1» на правой стороне или к «-1» на левой стороне. In the example shown above, the «jaw_dropper_01» would have its strongest influence at a keyed value of «0.5» in the sequence view, going back to about 50 % when the expression has a keyed value of «1»;.
Once you are done with creating all the different expressions you need for your character, you can save the expression library.
To make sure the expression library is loaded correctly next time you use this character, a cal file can be used to define the correct library for each head.
The cal-file for each head needs to be saved to the same folder where the head character is located. It only contains the relative path from your game directory to the Expression library-file.
head.cal: $facelib = objects/characters/human_male/sdk_example_head.fxl
The Sequence View
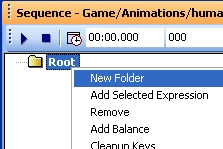
The sequence view also offers the same functionality to organize your expressions similar to the Expression Library by creating sub-folders, where the different nodes can be placed in. It also shows the «root»-folder by default under which all subsequent folders are created by right-clicking it, and choosing the «New Folder» command.
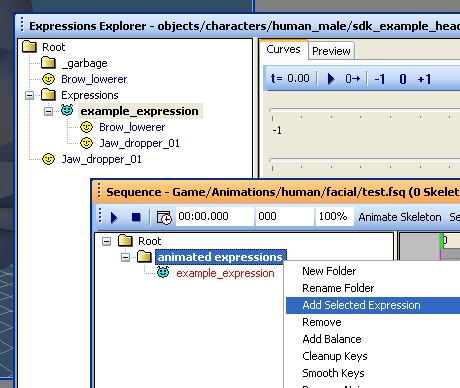
By highlighting an expression in the Expression Library view, and then right-clicking on one of the folders in the sequence-view, you can use the «Add Selected Expression»-command to add it to this folder.
Now you can start animating the expressions you added by placing keys on its curve, either by double-clicking it, or by using the «R»-shortcut, to place a key at the time-slider position. The structure and animated curves in the sequence view are saved together in the sequence file. Do this by going to «Sequence» save as, in the main toolbar of the Facial Editor.
The Facial editor also supports bone-driven animations. If the character cdf has bones for head or eye rotation, you can also set them up in the Facial Editor to be controlled and animated through curves and joysticks.
To do that go to the Expression Library, and right-click a folder to create a «New Bone Control».
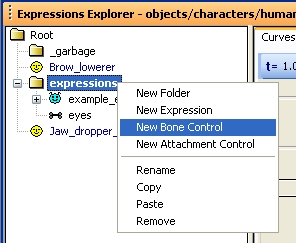
When you highlight the newly created bone control, you can see its options on the right side of the expression library view. In the drop down-list beside «Attachment/Bone» you can chose which bone to control with the expression. In the position and rotation settings below you can define an offset for an attachment and the axis and its limits about which the expression can rotate the bone.
Joystick Setup
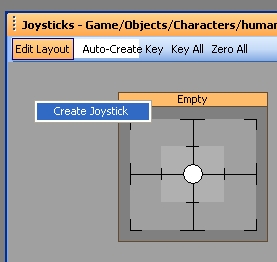
Another convenient method of animating expressions is by using joysticks. After you added expressions to the sequence view, you can go over to the Joysticks view, and setup joysticks to control their values. Turning on «Edit Layout» in the upper Left corner of the view brings you into edit-mode so you can create new controls by right-clicking in an empty area. While you are in «Edit Layout» mode you can change the shape of the templates by dragging on its sides or corners and arrange them freely in the view. Right-clicking on the template gives you various options to farther change the appearance of the controller like its name, or color i.e.
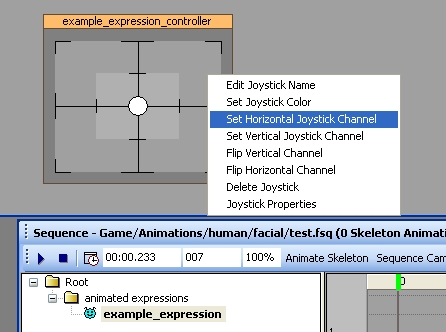
To activate the joystick, highlight the expression which should be driven by it in the sequence view, right-click on the empty template in the joystick view and select «Set Horizontal/Vertical Joystick Channel» to define which axis should animate the expression.
Now if you move the small white circle a key is automatically set at the current location of the time-slider. Be aware that this also works when you hit the play button, or the spacebar, which could be used to do a quick mouse movement capture session. Slowing down the playback speed can help with that.
After you saved the joystick setup from the main toolbar under joysticks >save as, make sure you also save the sequence, because the joystick-setup-file is referred in the sequence file so that the connections to the expressions in the sequence view are maintained.
This concludes the basic requirements to set up a head for facial animation. To be able to re-use already done expression libraries, or joystick-files and sequences, it is advisable to keep the naming convention for the morphs the same for all your head characters.

