Подбираемые объекты
Материал из CryWiki Russia
Содержание
|
Подбираемые объекты
Введение
В CryEngine 2 объекты можно сделать «подбираемыми». Игрок может взять их в одну или две руки, таскать их повсюду и бросать, а потом снова подбирать. Поведение подбора определено в игровом скрипте.
В игровом скрипте Crysis обозначены два типа поведения подбора:
- One-handed
- Игрок может подобрать объект левой рукой и удерживать объект в этой руке. Оружие находящиеся в правой можно использовать. Если игрок выберет двуручное оружие, оружие будет переключено на кулаки.
- Two-handed
- Игрок может подобрать и удерживать объект обеими рукам. Сами по себе руки не видны от первого лица. Оружие при этом использовать невозможно.
Требования
Подбираемые объект должен быть правильно настроен в пакетах трёхмерного моделирование, залог этого:
- Назначенная на него прокси-коллизия NoDraw.
- Определённая масса или плотность (либо в свойствах объект в 3ds Max, либо в свойствах сущности в Sandbox).
- Хелпер подбора с правильным названием.
Настройка в пакетах трёхмерного моделирования
3ds Max
Чтобы определить позицию объекта на экране при его подборе, должен быть назначен и привязан к объекту хелпер. Наличие такого хелпера в иерархии объекта, превратит объект в подбираемый. В Crysis, точка опоры («pivot») выровнен по кости «item_attachment», которая расположена в скелете анимации осколочной гранаты. Ориентация этой кости такова: +X = справа, +Y = спереди, +Z = сверху.
В анимации одноручного подбора, позиция кости «item_attachment» находится в левой руке игрока.
В двуручном подборе кость расположена по центру, между руками игрока.
Используйте «„Local“ Coordinate System» («систему „локальных“ координат») при регулировки позиции хелпера подбора.
Объекты, подбираемые одной рукой
Файл примера
Пример иерархии
Setting up the helper:
- Open your .max scene and create a «Dummy» helper.
Name it «grab_onehanded_01» (name needs to be correct) - Link the grab_onehanded_01 helper to you object.
- Align it to the object.
Proceed with export.
Two-handed pickable objects
Example-File
Example Hierarchy
Setting up the helper:
- Open your max scene and create a «Dummy» helper.
Name it «grab_twohanded_01» (name needs to be correct) - Link the grab_twohanded_01 helper to you object.
- Align it to the object. In Crysis the helper should be positioned below the object, so the player can see the object, since he can not see his own hands in two-handed mode.
Proceed with export.
Pieces of Destroyable objects
Overview
When a destroyable entity is destroyed, it will spawn pieces as well as a remaining object. These objects can be set up as pickables too.
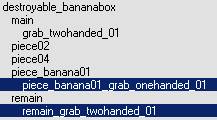
The process is equivalent to the one for one-handed and two-handed pickables, but the name of the object the helper is linked to needs to be added as a prefix in front of the helper name (e.g. remain_ grab_twohanded_01). A grab-helper for the non-destroyed version of the object («main») does not need to have a prefix.
Example-File
Example Hierarchy
Basic Setup in Max
- Open your max scene and create a «Dummy» helper for your object. Name it as described in the overview (e.g. remain_ grab_twohanded_01 or piece_banana01_ grab_onehanded_01).
- Link the grab-helper to your object.
- Align it to the object.
In most of the cases, the helper should be positioned below the object, so the player can see the object, since he can not see his own hands in two-handed mode.
Примечание:
The pivot of these spawned pieces/remain, that you can see in your DCC-tool, doesn’t match necessarily the entity position in game. This means, that placing the helpers for these objects could require a bit more of «trial and error». It should be a good idea to use always the non-destroyed version of the object as reference to align your helper.
- Repeat step 1-3 for all pieces/remains that should be pickable.
Proceed with export.
Using the pickable helper template file
Overview
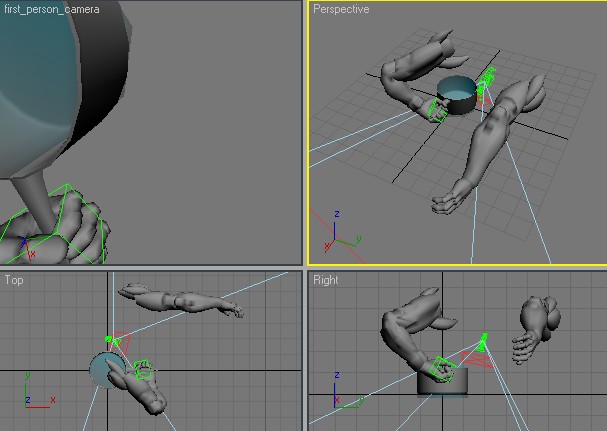
During the Crysis development we developed an advanced technique to align one-handed grab-helpers to pickable objects in 3D Studio Max. We created a template file that contains the player’s arms in the grab-pose that will be seen in the first person view of the game, and a camera that replicates the first person-camera of the game. It is also a grab helper included that is connected to a helper with a transformation-constraint. This makes it easier to rotate the whole template file and the grab-helper at the same time without unlinking the helper.
The key about this technique is to rotate the whole arms-template including the grab-helper, until the result looks as desired in the first person camera.
The disadvantage of this technique is that the scene might become complex, especially if more than one template is merged into the scene. Efficient layer usage will become helpful for this.
Pickable helper template file:
Setup in 3D Studio Max:
Merge in the «pickable_template.max»-file. Select all the objects in themerge-window. Link the «grab_onehanded_01» helper to your object. Adjust theposition and rotation of the «pickable_template»-helper until you aresatisfied with the position. The «grab_onehanded_01» helper is constrained to the «pickable_template», so it will inherit all transformation changes of the «pickable_template»-helper
Proceed with export.
Example for a well aligned pickable helper template:
Export
- Add the root node of your pickable object to the export list.
- Make sure «export by node» is checked and «merge all nodes» unchecked.
- Click export.
Примечание:
Everything linked to this object including all the sub-objects/helpers will be exported into one file.
Setup in Sandbox
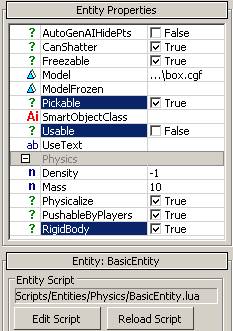
In order to make your pickable object working in Sandbox, place it as a GeomEntity or any Entity which has set «Pickable» and «RigidBody» to «true». «Usable» has to be disabled.
Pickable objects-types are:
- Entities with «Pickable» and «RigidBody» set to «true» and «Usable&» to «false».
- Particles containing a grab-helper.
- Ragdoll objects containing a grab-helper (e.g. Dead bodies)
- «Default»-Class entities (pieces of broken vegetation)
- Procedural Vegetation with «Pickable» flag set to true.
Example-properties of a pickable entity:
Picking of animated non-AI characters
Overview
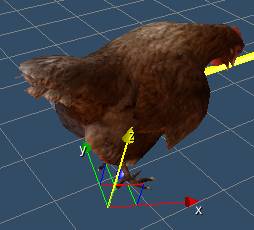
Non-AI-Characters can be set up to be pickable, too (Animals for example).
In this case we can not set up the grab-helper attachment in a DCC-tool but in the Character Editor.
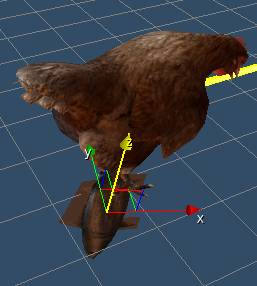
The grab-helper will be will be added to the character as a bone attachment. So the orientation of the helper is dependent on the bone it will be attached to. You don’t necessarily need to apply an object to the attachment, but for easier alignment it is recommended to use an object with a clearly visible orientation. The object will be removed from the attachment later on when the desired result is achieved.
Attachment Creation
- Open the .chr or .cdf file you want to make pickable in the character editor.
- Add a new attachment.
- Apply this attachment as a bone-attachment to any bone (preferably root-bone of the rig, since it is not animated).
- Move and rotate the object until you think it might be alignedcorrectly later in the first-person view.
- Save your work as a .cdf file.
- Place your animated non-AI character in the Perspective view in Sandbox (Animals are usually placed from the ArchetypeEntity Library).
- Go into game-mode, pick up your animated non-AI character and see if its alignment looks as desired in the first-person view.
- In order to remove the object that was used as helper for the alignment, open your .cdf file in Notepad and remove the object path.
- Repeat steps 4. — 7. until the desired result is achieved.
After removing the Object path in notepad:
Notes
Changes on the pickability behaviour of AI-Characters andprocedural breaking environment objects have to be modified in the gamecode. For AI-Characters, the name of the bone which serves as a grab helper needs to be defined by game code. The grab position of pickable procedural breaking environment pieces is located on an offset to its pivot, which needs to be defined by game code
Debugging
e_debug_draw 15 displays all grab_helpers

