Размещение и модификация элементов уровня
Материал из CryWiki Russia
DCamer (Обсуждение | вклад) (Новая страница: «== Размещение и модификация объектов == Image:Sandbox ModifySceneElements image001.jpg === Описание === Этот ра...») |
DCamer (Обсуждение | вклад) |
||
| Строка 13: | Строка 13: | ||
Выберите режим перемещения и следования за ландшафтом.<br> | Выберите режим перемещения и следования за ландшафтом.<br> | ||
| - | Во-первых, вам нужно сделать небольшие настройки того, как объект помещается на уровень. | + | Во-первых, вам нужно сделать небольшие настройки того, как объект помещается на уровень. |
Выбрав режим перемещения вы сможете перемещать объект. Вы можете сделать это, нажимая на кнопки, представленные ниже. Вы также должны выбрать "следование за ландшафтом", при этом объект будет скользить по ландшафту, при его перемещении. | Выбрав режим перемещения вы сможете перемещать объект. Вы можете сделать это, нажимая на кнопки, представленные ниже. Вы также должны выбрать "следование за ландшафтом", при этом объект будет скользить по ландшафту, при его перемещении. | ||
| Строка 21: | Строка 21: | ||
Кроме того, режим перемещения может быть найден в ''Edit > Editing mode > Move'', и следование за ландшафтом в ''Edit > Constrain > Constrain to Terrain/Geometry.'' | Кроме того, режим перемещения может быть найден в ''Edit > Editing mode > Move'', и следование за ландшафтом в ''Edit > Constrain > Constrain to Terrain/Geometry.'' | ||
| - | ==== | + | ==== Создание браша ==== |
| - | + | Для начала, поставим очень простой объект, называемый брашем. Чтобы сделать это, откройте вкладку Objects сворачиваемой панели и выберите кнопку "Brush". | |
[[Image:Sandbox ModifySceneElements image005.png]] | [[Image:Sandbox ModifySceneElements image005.png]] | ||
| - | ==== | + | ==== Выбор браша ==== |
| - | + | Далее, вам нужно выбрать геометрию объекта, который вы хотите разместить. Давайте разместим камень. Дважды щелкните по папке "natural", как показано ниже. | |
[[Image:Sandbox ModifySceneElements image007.png]] | [[Image:Sandbox ModifySceneElements image007.png]] | ||
| - | + | Единожды щелкните по подпапкам, сначала по "rocks", а затем по "vulkan_rocks", приведет вас к чему-то вроде того, что показано ниже. | |
[[Image:Sandbox ModifySceneElements image009.jpg]] | [[Image:Sandbox ModifySceneElements image009.jpg]] | ||
| - | ==== | + | ==== Перетаскивание браша на уровень ==== |
| - | + | Наведите курсор на название браша, любого какого хотите в проводнике брашев, нажмите и удерживайте нажатой левую кнопку мыши на браше, перетащите его мышью в главное окно редактора и отпустите кнопку мыши. | |
| - | + | В нашем случаем, предположим, что вы хотите перетащить '''vulcan_rock_a''' | |
[[Image:Sandbox ModifySceneElements image010.png]] | [[Image:Sandbox ModifySceneElements image010.png]] | ||
| - | + | Вы увидите что-то вроде этого: | |
[[Image:Sandbox ModifySceneElements image012.png]] | [[Image:Sandbox ModifySceneElements image012.png]] | ||
| - | + | Если вы не видите что-то вроде этого, не волнуйтесь. Вернитесь к предыдущему шагу, где "режим перемещения" и "следование за ландшафтом", и убедитесь, что они включены. | |
| - | + | Затем следуйте инструкциям ниже. | |
If you accidentally lost your object or deselected it, press Ctrl-Z to undo your last action. | If you accidentally lost your object or deselected it, press Ctrl-Z to undo your last action. | ||
Версия 10:37, 7 октября 2010
Содержание |
Размещение и модификация объектов
Описание
Этот раздел будет посвящен основам размещения объектов в редакторе, выбор, сброс выделения и перемещение его в окружении, а также другие различные модификации, которые вы можете выполнить на объекте.
А также охватывает некоторые другие полезные функции редактора, чтобы помочь вам в организовании и управлении вашими объектами.
Размещение браша
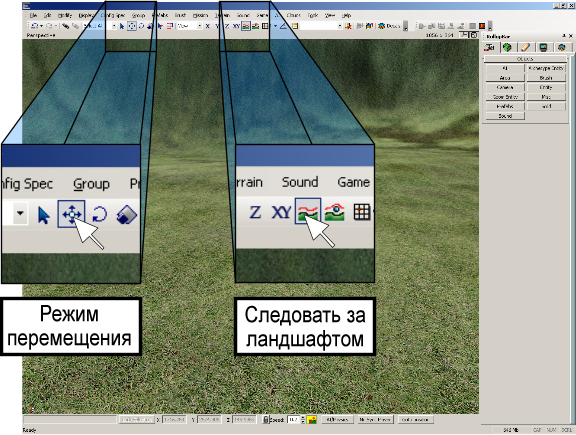
Выберите режим перемещения и следования за ландшафтом.
Во-первых, вам нужно сделать небольшие настройки того, как объект помещается на уровень.
Выбрав режим перемещения вы сможете перемещать объект. Вы можете сделать это, нажимая на кнопки, представленные ниже. Вы также должны выбрать "следование за ландшафтом", при этом объект будет скользить по ландшафту, при его перемещении.
Кроме того, режим перемещения может быть найден в Edit > Editing mode > Move, и следование за ландшафтом в Edit > Constrain > Constrain to Terrain/Geometry.
Создание браша
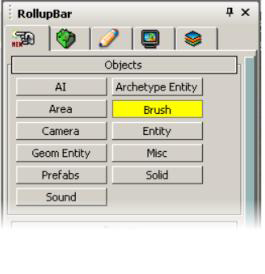
Для начала, поставим очень простой объект, называемый брашем. Чтобы сделать это, откройте вкладку Objects сворачиваемой панели и выберите кнопку "Brush".
Выбор браша
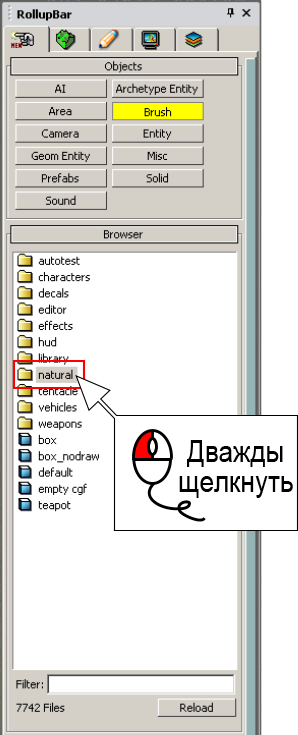
Далее, вам нужно выбрать геометрию объекта, который вы хотите разместить. Давайте разместим камень. Дважды щелкните по папке "natural", как показано ниже.
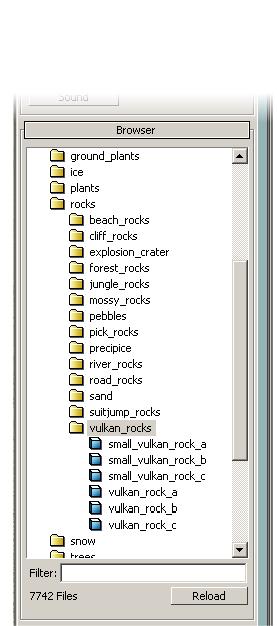
Единожды щелкните по подпапкам, сначала по "rocks", а затем по "vulkan_rocks", приведет вас к чему-то вроде того, что показано ниже.
Перетаскивание браша на уровень
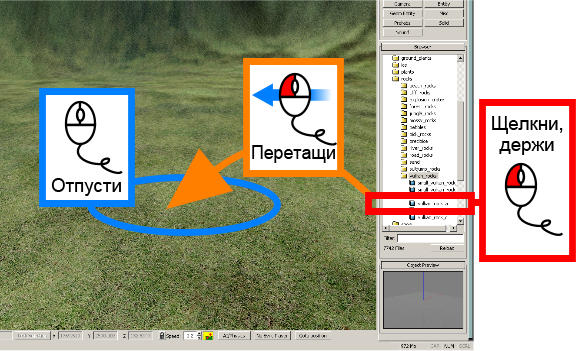
Наведите курсор на название браша, любого какого хотите в проводнике брашев, нажмите и удерживайте нажатой левую кнопку мыши на браше, перетащите его мышью в главное окно редактора и отпустите кнопку мыши.
В нашем случаем, предположим, что вы хотите перетащить vulcan_rock_a
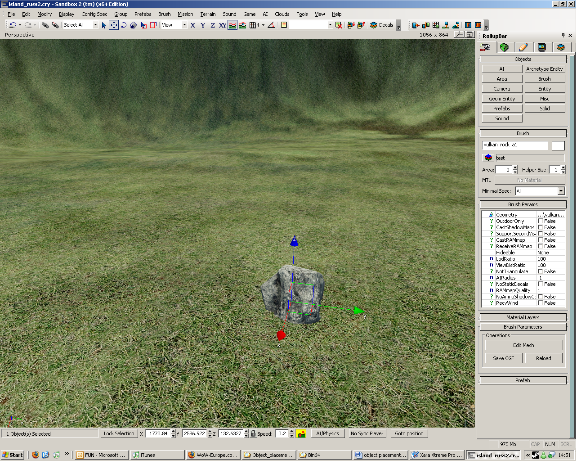
Вы увидите что-то вроде этого:
Если вы не видите что-то вроде этого, не волнуйтесь. Вернитесь к предыдущему шагу, где "режим перемещения" и "следование за ландшафтом", и убедитесь, что они включены.
Затем следуйте инструкциям ниже.
If you accidentally lost your object or deselected it, press Ctrl-Z to undo your last action.
Snapping an entity to the ground
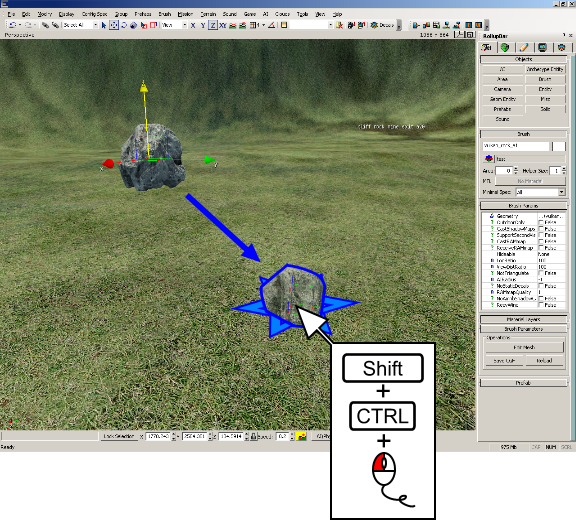
When you are in “move mode” with an object selected, press Ctrl + Shift + Left mouse button to “snap” the pivot point of the entity to the ground where you click.
Deselecting and Selecting Objects
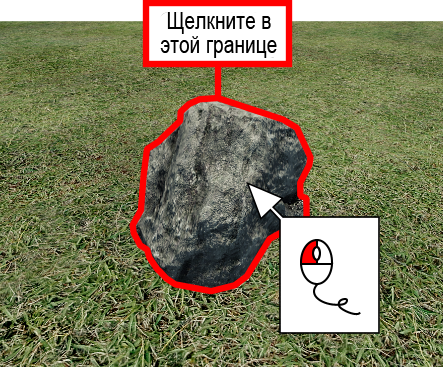
So, now we have an object in view, lets deselect it and then select it again. There are 2 easy ways of deselecting objects – press Escape, or click anywhere else in the view screen (be careful not to click on another object though). Deselect your object now using one of these methods.
To select an object, simply move your mouse over the object and press the left mouse button.
Selecting multiple objects
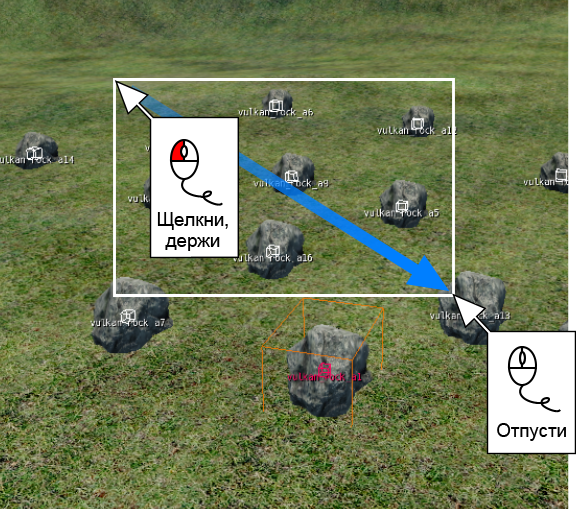
To select multiple objects, click and hold the left mouse button in the perspective view, drag a box around the objects you want to select, then release when all the objects required are inside the selection box.
Adding and Deselecting objects
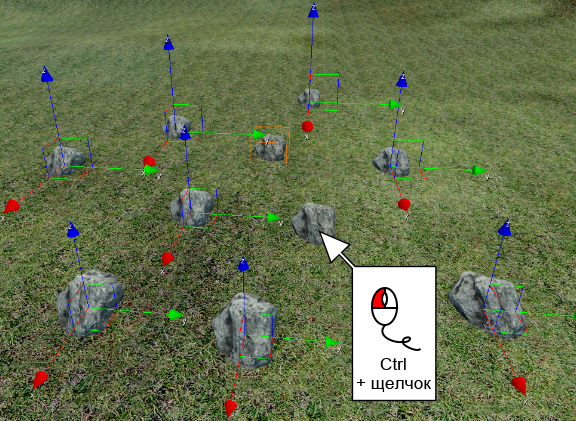
Press Ctrl and click with the left mouse button to remove an object from your current selection.
Also, the same procedure will add an object to your current selection.
Modifying an object
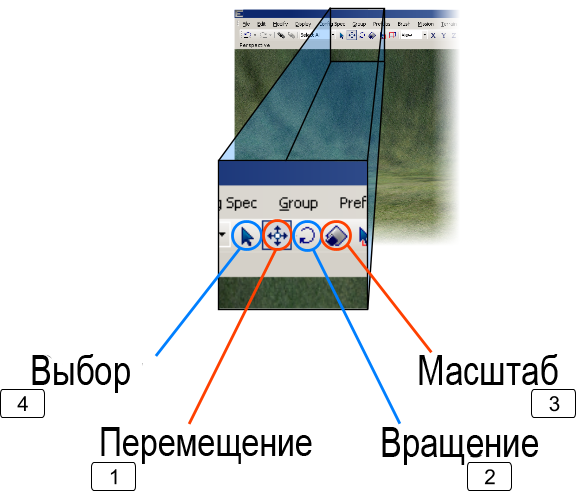
The different object manipulation controls You can select different object control modes by clicking the appropriate icon, or pressing the 1 2 3 and 4 keys.
Alternatively, select the individual modes using the edit menu in the menu bar at the top of the screen.
Edit -> Editing mode -> Select Edit -> Editing mode -> Move Edit -> Editing mode -> Rotate Edit -> Editing mode -> Scale
MoveMode
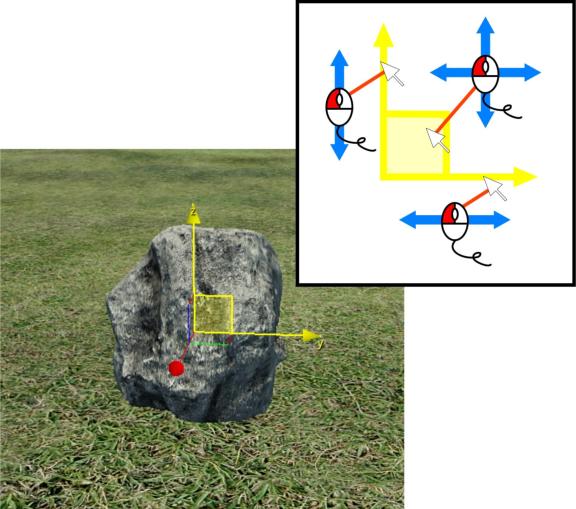
Select & Move tool
Make sure you’re in move mode. If you’re not, select it.
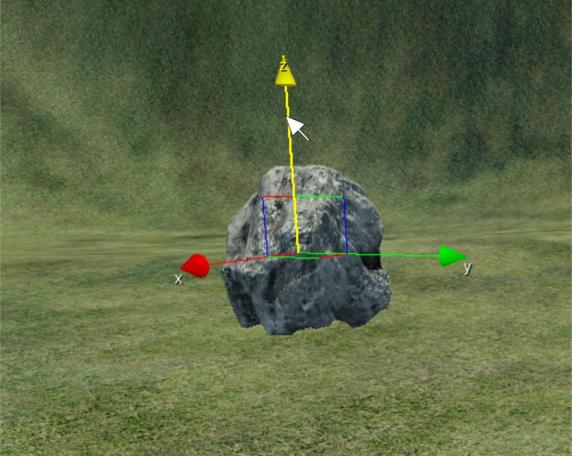
Now, select your object, and you will see it has X, Y and Z selection bars, each corresponding to a different direction. The X bar is red, the Y bar is green and the Z bar is blue. The bar you previously had the mouse over will be yellow.
If you move your mouse on to one of the bars, click and hold down the left mouse button, you can drag it back and forth in the direction it’s pointing, along that axis.
You will notice between each bar, there is a square. Use this to drag along 2 different axis.
RotateMode
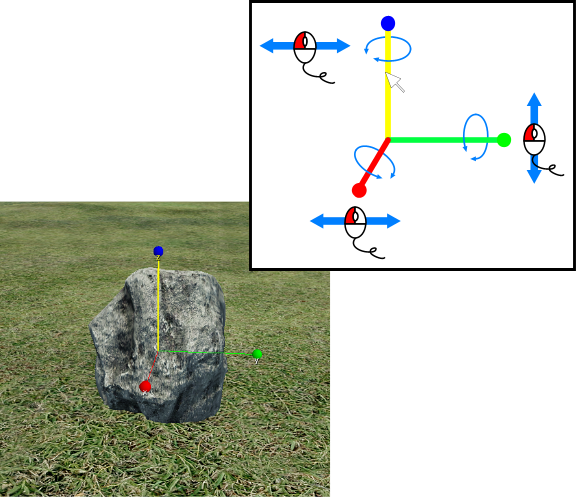
Select & Rotate tool
As with move, you can rotate your object using its control bars.
Edit -> Editing mode -> Rotate
ScaleMode
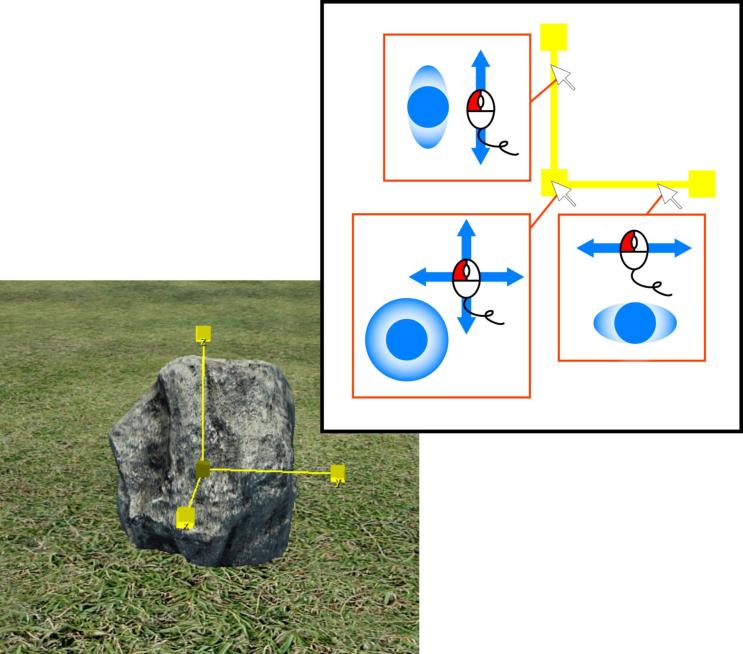
Select & Scale tool
The scale tool allows you to increase the size of an object, along its different axis’.
Edit -> Editing mode -> Scale
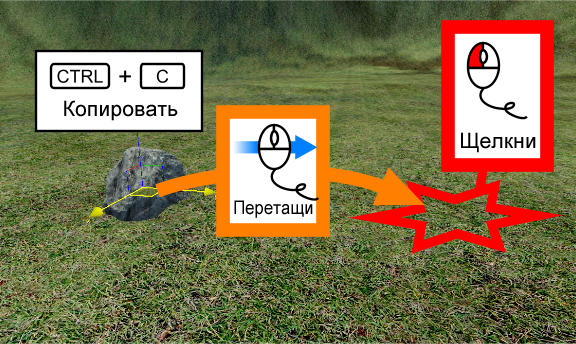
Clone
The first thing you need to know after making your first object, is how to make more of them
Simply select your object, press Ctrl-C, then move your mouse to where you want the copy of your object to be, then click the left mouse button.
You can also copy an object by going into the menu bar at the top of the screen.
Edit -> Clone (Ctrl+C)
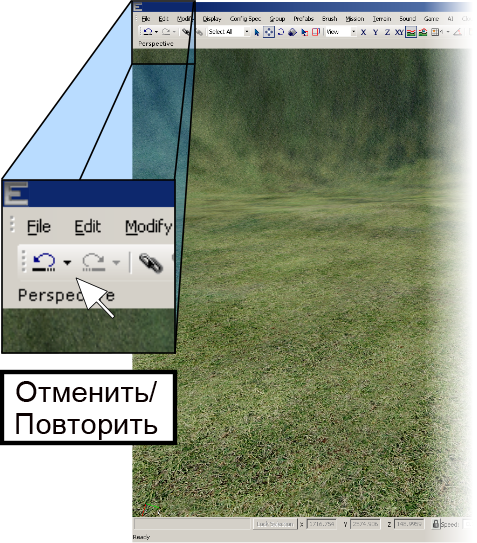
Undo and Redo
At the top left of the editor, you’ll notice two icons with arrows inside them. These are undo and redo. Pressing undo will take back your previous editor action, and after you undo is performed, redo will perform the action you just undid.
Also accessed by: Edit Undo (Ctrl Z) Edit Redo
Advanced object manipulation
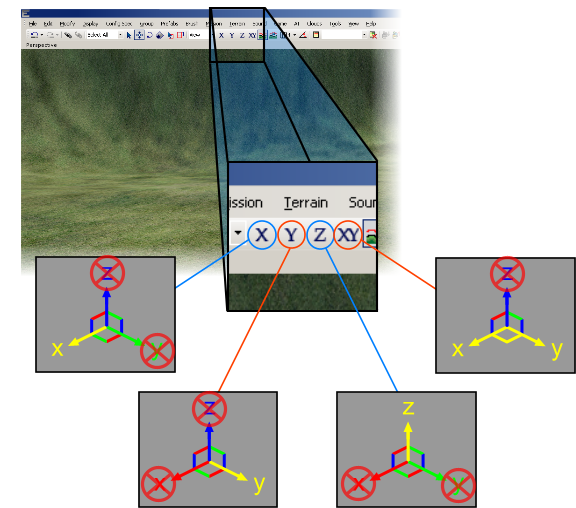
Axis restraints
You will see the icons in the image below at the top of the editor frame. Each of the icons “restrains” the object, to only move in the direction you select, when you drag the object. Clicking a different axis of the object will change the restraint.
Shown below, the yellow highlight is the direction the object is restrained in. For example, the XY restraint will restrain the object to only move horizontally.
Also accessed by: Edit -> Constrain -> Constrain to X Axis Edit -> Constrain -> Constrain to Y Axis Edit -> Constrain -> Constrain to Z Axis Edit -> Constrain -> Constrain to XY Plane
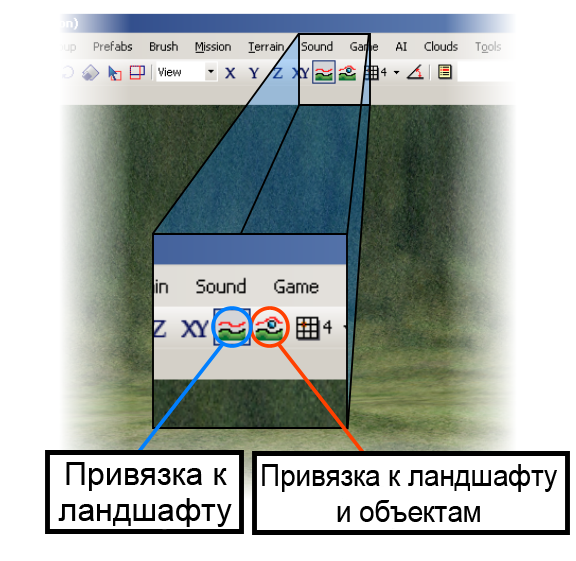
Snap to Terrain/Objects
The terrain snap and object/terrain snap make sure your objects move along the ground correctly. Terrain snap will only snap to the terrain itself. Object/Terrain snap will also move your objects along any other objects on the ground.
Please note, this will not affect the rotation of your object at all, and it will snap the object to the floor at its axis point.
Also accessed by: Edit -> Constrain -> Constrain to Terrain/Geometry
Snap to grid
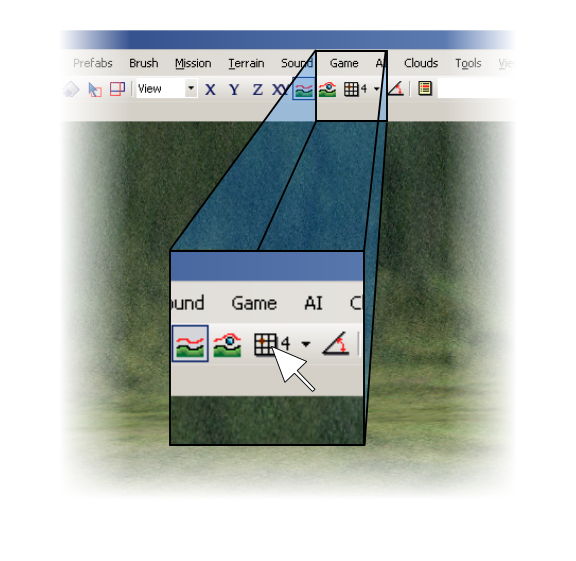
Click the button below once to turn snap to grid on. This will make sure any objects you move only move in distance “steps”.
Also accessed by: Display -> Snap to Grid
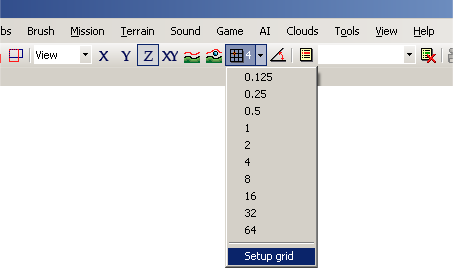
The small arrow directly next to the main movement snap button will bring up a drop down menu, which can be used to select the size of the grid to use to align against. Click Setup Grid.
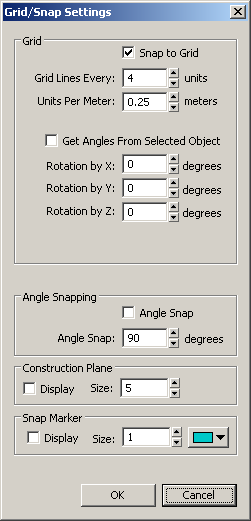
This is what you should see after clicking Setup grid.
Snap Angle
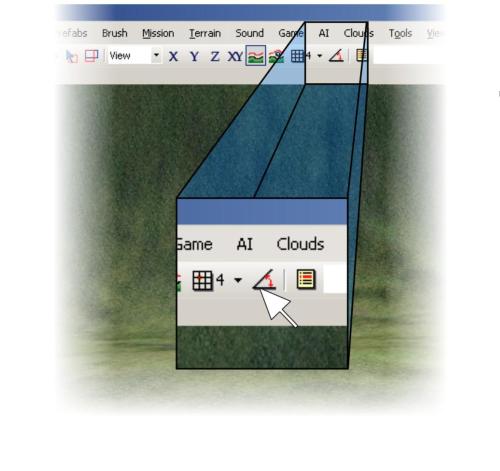
As for grid snap, angle snap will cause your objects to snap and only rotate by the predefined set amount.
Also accessed by: Display -> Snap Angle
Go to object and align to object
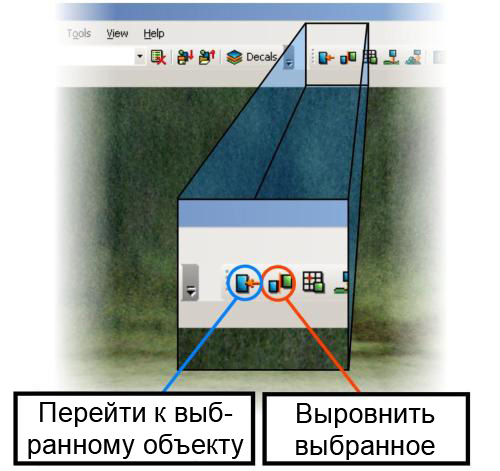
To use “go to selected object”, select the object you need, and click the button shown, and the perspective view window will center on the object you have selected.
To use “align selection”, select an object, press the align selection button, then click the destination object. All transforms (position, rotation, scale) will be copied from destination object to your initial selected object.
Also accessed by: Modify -> Goto Selection Modify -Y Align/Snap -> Align to Object
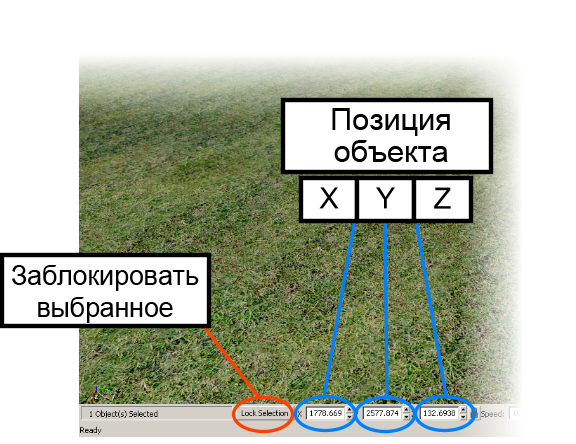
Object lock and object positional controls At the bottom of the screen, you’ll see several other controls.
Lock selection will make you unable to deselect the current object
The object position controls allow you to move an object to an exact position in the level, using the type in dialog boxes. Also, fine tuning an object’s position can be done using the up and down arrows to the right of each dialog box.
Also accessed by: Edit -> Lock Selection
