Система Flash UI
Материал из CryWiki Russia
DCamer (Обсуждение | вклад) |
DCamer (Обсуждение | вклад) |
||
| Строка 4: | Строка 4: | ||
== Настройка XML для Flash-ассета == | == Настройка XML для Flash-ассета == | ||
| - | |||
Система '''Flash UI''' считывает все XML-файлы, которые находятся в'''Game/Libs/UI/UIElements''' и создаёт потоковые ноды для контролирования Flash-ассетов. | Система '''Flash UI''' считывает все XML-файлы, которые находятся в'''Game/Libs/UI/UIElements''' и создаёт потоковые ноды для контролирования Flash-ассетов. | ||
| Строка 53: | Строка 52: | ||
</UIElements> | </UIElements> | ||
</source>}} | </source>}} | ||
| - | |||
=== Функции === | === Функции === | ||
| - | |||
Функции, которые должны будут вызывать извне, нужна определить в списке '''<functions>''' элемента. | Функции, которые должны будут вызывать извне, нужна определить в списке '''<functions>''' элемента. | ||
| Строка 74: | Строка 71: | ||
</source>}} | </source>}} | ||
| - | Где '''name="…"''' | + | Где '''name="…"''' — название функции, отображаемое в потоковом графе, а '''funcname="…"''' — название функции в самом ActionScript. |
Система автоматически создаст нод, чтобы вызывать эту функцию. | Система автоматически создаст нод, чтобы вызывать эту функцию. | ||
| Строка 87: | Строка 84: | ||
=== События === | === События === | ||
| - | Чтобы получить уведомления о каком-либо взаимодействии с пользователем, например, если была нажата кнопка, можно определить события в списке '''<events>'''. Чтобы вызвать срабатывание события в коде '''ActionScript''', необходимо вызвать ''fscommand( | + | Чтобы получить уведомления о каком-либо взаимодействии с пользователем, например, если была нажата кнопка, можно определить события в списке '''<events>'''. Чтобы вызвать срабатывание события в коде '''ActionScript''', необходимо вызвать ''fscommand(«строкаКоманда»)''. Эти ''fscommands'' перехватываются движком. |
| - | Например, в функции '''onPress''' у кнопки, вы можете вызвать ''fscommand'' со строкой ''' | + | Например, в функции '''onPress''' у кнопки, вы можете вызвать ''fscommand'' со строкой '''«onMyButtonPressed»''' и несколькими аргументами. |
{{Код|заголовок=ActionScript|блок=<source lang="actionscript">myButton.onPress = function() | {{Код|заголовок=ActionScript|блок=<source lang="actionscript">myButton.onPress = function() | ||
| Строка 112: | Строка 109: | ||
=== Переменные, массивы и мувиклипы === | === Переменные, массивы и мувиклипы === | ||
| - | |||
Доступ к массиву или переменной также могут быть определены в XML-файле. | Доступ к массиву или переменной также могут быть определены в XML-файле. | ||
| Строка 132: | Строка 128: | ||
</source>}} | </source>}} | ||
| - | + | Чтобы получить или задать переменные, выберите в выпадающем списке потоковый нод '''UI:Variable:Var''' или '''UI:Variable:Array'''. | |
[[Файл:Variable_nodes.png]] | [[Файл:Variable_nodes.png]] | ||
| - | + | {{Примечание|Массивы представляют собой строки разделённые запятой.}} | |
| - | + | Вы также можете получить доступ к определённым мувиклипам через потоковые ноды. | |
[[Файл:Mc_gotoandplay.png]] | [[Файл:Mc_gotoandplay.png]] | ||
| - | == | + | == Отображение/скрытие и настройка GFX-файлов == |
| + | Чтобы отобразить или скрыть Flash-ассет используйте нод '''UI:Display:Display'''. Вы можете выбрать элемент в выпадающем списке. | ||
| - | + | Чтобы настроить поведение и ограничения используйте ноды '''UI:Display:Config''' и '''UI:Display:Constraints''' соответственно. | |
| - | + | ||
| - | + | ||
[[Файл:Config_node.png]] | [[Файл:Config_node.png]] | ||
[[Файл:Constraints_node.png]] | [[Файл:Constraints_node.png]] | ||
| - | + | Также можно инициализировать все эти настройки в XML-файле. | |
{{Код|заголовок=hud.xml|блок=<source lang="xml"><UIElement name="HUD" mouseevents="1" keyevents="1" cursor="1" console_mouse="1" console_cursor="1"> | {{Код|заголовок=hud.xml|блок=<source lang="xml"><UIElement name="HUD" mouseevents="1" keyevents="1" cursor="1" console_mouse="1" console_cursor="1"> | ||
<GFx file="HUD.gfx" layer="1" alpha="0.5"> | <GFx file="HUD.gfx" layer="1" alpha="0.5"> | ||
| - | <!-- | + | <!-- режим выравнивание этого элемента --> |
<Constraints> | <Constraints> | ||
<Align mode="fullscreen" /> | <Align mode="fullscreen" /> | ||
| Строка 169: | Строка 164: | ||
</source>}} | </source>}} | ||
| - | === | + | === Конфигурация === |
| + | {{BTS|mouseevents|desc=0=отключено, 1=включено, если включено события мыши будут пересылаться в файле Flash (щелчки и перемещения мыши).}} | ||
| - | + | {{BTS|cursor|desc=0=отключено, 1=включено, если включено аппаратный курсор мыши будет видимым пока отображен Flash-элемент.}} | |
| - | 0= | + | |
| - | + | {{BTS|keyevents|desc=0=отключено, 1=включено, если включено ключи событий будут пересылаться в Flash-элемент.}} | |
| - | 0= | + | |
| - | + | {{BTS|console_mouse|desc=0=отключено, 1=включено, если включено контроллер будет работать как мышь на консоли (аналоговый стик). Только если включено '''mouseevents'''.}} | |
| - | 0= | + | |
| - | + | {{BTS|console_cursor|desc=0=отключено, 1=включено, если включено аппаратный курсор мыши также будет отображён на консоле. Только если включено '''cursor'''.}} | |
| - | 0= | + | |
| - | + | {{BTS|layer|desc=от 0 до ''n'', определяет, в каком порядке будут отображены элементы (if more than one flash element is visible).}} | |
| - | 0 | + | |
| - | + | {{BTS|alpha|desc=от 0 до 1, альфа фона Flash-элемента.}} | |
| - | 0 | + | |
| - | + | === Ограничения === | |
| - | + | Доступно три режима размещения ассетов на экране: | |
| - | = | + | {{BTS|"fixed"|desc=В этом режим Flash-ассет отображается в фиксированном положение, определённым значениями '''top''', '''left''', '''width''' и '''height'''.}} |
| - | + | {{BTS|"dynamic"|desc=В этом режим ассет выравнивается якорями. Для вертикального выравнивания возможны '''top''', '''center''' или '''bottom''', для горизонтального выравнивания возможны '''left''', '''center''' или '''right'''.}} | |
| + | Если '''scale''' равно '''1''', элемент будет максимально масштабирован, не деформируя пропорции. Если '''scale''' равно '''0''', Flash-ассет не будет масштабироваться. | ||
| - | + | Если '''max''' равно '''1''', то элемент будет максимизирован, так, что 100% экрана будут закрыты (это может привести к тому, что некоторые части элемента выйдут за экран) В противном случае асстер будет подогнан под экран, возможны некоторые незакрытые пространства слева/справа или сверху/снизу. | |
| - | + | ||
| - | + | {{BTS|"fullscreen"|desc=В этом режим окно проекции ассета равно окну проекции рендера. Если '''scale''' равно '''1''' ассет растягивается по размеру всего экрана, в ином случае нет.}} | |
| - | + | ||
| - | + | == Экземпляры элементов == | |
| - | + | У каждого нода есть порт '''InstanceID'''. Благодаря этому идентификатору экземпляра, у вас может быть более одного экземпляра любого Flash-ассета. Порт '''InstanceID''' любого нода UI определяет, на какой экземпляр будет влиять этот нод. Если вы используете нод с новым идентификатором экземпляра, автоматически будет создан новый экземпляр этого Flash-ассета. Если вы использует '''-1''' в качестве идентификатора экземпляра, нод будет влиять на все экземпляры этого Flash-элемента. | |
| - | + | == Полезные функции == | |
| - | + | Доступно несколько специальных функции '''ActionScript''', которые автоматически вызываются системой UI. | |
| - | + | Эти функции могут быть определены in the rootspace of your *'''ActionScript'''* and don’t need to be defined in the xml file. | |
| - | + | ||
| - | + | ||
| - | + | ||
| - | + | ||
| - | + | ||
| - | + | ||
| - | + | ||
| - | + | ||
=== Функции === | === Функции === | ||
| - | ==== | + | ==== Функции ActionScript ==== |
| + | ;cry_onSetup:Если эта функция существует, она вызывается однократно когда GFX/SWF-файл загружен движком. | ||
| + | <source lang="actionscript">function cry_onSetup(_bIsConsole) // истинно если запущено на консоле, ложь если на ПК</source> | ||
| - | + | ;cry_onShow:Если эта функция существует, она вызывается однократно когда GFX/SWF-файл показан. | |
| - | + | ||
| - | + | ||
| - | + | ||
| - | + | ||
| - | + | ||
<source lang="actionscript">function cry_onShow()</source> | <source lang="actionscript">function cry_onShow()</source> | ||
| - | + | ;cry_onHide:Если эта функция существует, она вызывается однократно когда GFX/SWF-файл скрыт. | |
| - | + | ||
<source lang="actionscript">function cry_onHide()</source> | <source lang="actionscript">function cry_onHide()</source> | ||
| - | + | ;cry_onResize:Если эта функция существует, она вызывается однократно когда разрешение движка изменено. | |
| - | + | ||
<source lang="actionscript">function cry_onResize(_intWidth, _intHeight)</source> | <source lang="actionscript">function cry_onResize(_intWidth, _intHeight)</source> | ||
| - | + | ;cry_onBack:Если эта функция существует, она вызывается однократно, если игрок нажал кнопку '''Back''' на контроллере. | |
| - | + | ||
<source lang="actionscript">function cry_onBack()</source> | <source lang="actionscript">function cry_onBack()</source> | ||
| - | + | ;cry_requestHide:Эта функция вызывается, если сработал порт '''RequestHide''' у нода '''UI:Display:Display''' (или через код/Lua). Может быть использовано для плавного исчезновения элемента. | |
| - | + | ||
<source lang="actionscript">function cry_requestHide()</source> | <source lang="actionscript">function cry_requestHide()</source> | ||
| - | ==== | + | ==== FSCommand ==== |
| - | + | Доступно несколько строк FSCommand, которые могут быть вызваны вашим ActionScript. | |
| - | + | ||
| - | + | ||
| - | + | ||
| - | + | ||
| - | + | ||
| - | = | + | ;cry_hideElement:Если FSCommand выполнен с этой строкой, он укажет системе UI скрыть элемент. |
| + | <source lang="actionscript">fsCommand("cry_hideElement");</source> | ||
| - | + | === Пример === | |
| + | Плавное появление/исчезновение элемента UI. | ||
| - | <source lang="actionscript">// | + | <source lang="actionscript">// создаём функцию onEnterFrame для плавного появления корневого элемента (если показан элемент UI) |
function cry_onShow() | function cry_onShow() | ||
{ | { | ||
| Строка 269: | Строка 240: | ||
else | else | ||
{ | { | ||
| - | // | + | // очищаем функцию onEnterFrame |
onEnterFrame = function() {}; | onEnterFrame = function() {}; | ||
} | } | ||
| Строка 275: | Строка 246: | ||
} | } | ||
| - | // | + | // создаём функцию onEnterFrame для плавного исчезновения корневого элемента (если запрошено системой UI) |
function cry_requestHide() | function cry_requestHide() | ||
{ | { | ||
| Строка 286: | Строка 257: | ||
else | else | ||
{ | { | ||
| - | // | + | // очищаем функцию onEnterFrame и уведомляем систему UI, что этот элемент больше не надо отрисовывать. |
onEnterFrame = function() {}; | onEnterFrame = function() {}; | ||
fscommand("cry_hideElement"); | fscommand("cry_hideElement"); | ||
| Строка 293: | Строка 264: | ||
} | } | ||
</source> | </source> | ||
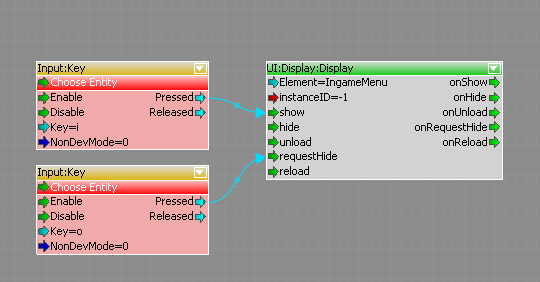
| - | + | Теперь вы можете делать, чтобы элемент плавно появлялся/исчезал при срабатывании про '''show'''/'''requestHide''' у нода '''UI:Display:Display'''. | |
[[Файл:fg_fadeElement.png]] | [[Файл:fg_fadeElement.png]] | ||
Версия 17:35, 27 февраля 2012
Система UI Action позволяет настраивать и контролировать любые Flash-элементы UI в потоковом графе.
Для этого каждый Flash-ассет может быть определена в XML-файле со всеми событиями, функциями и переменными, которые должны быть доступны в потоковом графе.
Содержание |
Настройка XML для Flash-ассета
Система Flash UI считывает все XML-файлы, которые находятся вGame/Libs/UI/UIElements и создаёт потоковые ноды для контролирования Flash-ассетов.
Откройте существующий XML-файл или создайте новый, чтобы определить новый UIElement.
Основное определение Flash-ассета:
<UIElements name="HudElements"> <!-- название группы для этого элемента -->

  <!-- определение элемента UI под названием "HUD" -->
  <UIElement name="HUD">

    <!-- GFX/SWF-файл для этого элемента UI -->
    <GFx file="HUD.gfx" layer="1">
      <!-- режим выравнивание этого элемента -->
      <Constraints>
        <Align mode="dynamic" halign="center" valign="center" scale="1" max="1" />
      </Constraints>
    </GFx>

    <!-- доступные функции-->
    <functions>
    </functions>

    <!-- доступные события, которые вызываются Flash-ассетом -->
    <events>
    </events>

    <!-- доступные переменные-->
    <variables>
    </variables>

    <!-- доступные массивы -->
    <arrays>
    </arrays>

    <!-- доступные мувиклипы -->
    <movieclips>
    </movieclips>

  </UIElement>

  <!-- определение другого элемента UI под названием "LoadingScreen" -->
  <UIElement name="LoadingScreen">
  ...
  </UIElement>

</UIElements>
Функции
Функции, которые должны будут вызывать извне, нужна определить в списке <functions> элемента.
Например, функция ActionScript, для установки полосы здоровья:
function setHealth(iHealth:Number):void
{
  // установка полосы здоровья
}
Может быть определена в XML так:
<function name="SetHealth" funcname="setHealth">
  <param name="Health" desc="Players current health"/>
</function>
Где name="…" — название функции, отображаемое в потоковом графе, а funcname="…" — название функции в самом ActionScript.
Система автоматически создаст нод, чтобы вызывать эту функцию.
Примечание:
Кроме того, можно определить функции, которые находятся не в корневом пространстве Flash-файла, например:
<function name="SetHealth" funcname="myHealthMc.mysubmc.setHealth">
  <param name="Health" desc="Players current health"/>
</function>
События
Чтобы получить уведомления о каком-либо взаимодействии с пользователем, например, если была нажата кнопка, можно определить события в списке <events>. Чтобы вызвать срабатывание события в коде ActionScript, необходимо вызвать fscommand(«строкаКоманда»). Эти fscommands перехватываются движком.
Например, в функции onPress у кнопки, вы можете вызвать fscommand со строкой «onMyButtonPressed» и несколькими аргументами.
myButton.onPress = function()
{
  var args:Array = new Array();
  args.push(argument1);
  args.push(argument2);
  fscommand("onMyButtonPressed", args);
}
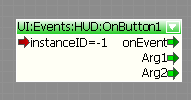
Чтобы перехватить это событие, добавьте тег <event> в список <events>:
<event name="OnButton1" fscommand="onMyButtonPressed">
  <param name="Arg1" desc="Some argument"/>
  <param name="Arg2" desc="Another argument"/>
</event>
Система создаст нод для перехвата этого события.
Переменные, массивы и мувиклипы
Доступ к массиву или переменной также могут быть определены в XML-файле.
Просто добавьте тег <variable> в список <variables>, тег <array> в список <arrays> или тег <movieclip> в список <movieclips>.
<variables>
  <variable name="SomeVariable" varname="someVariable"/>
  <variable name="TextField" varname="_root.myTextfield.text"/>
</variables>

<arrays>
  <array name="SomeArray" varname="_root.mc2.someArray"/>
</arrays>

<movieclips>
  <movieclip name="MovieClip1" instancename="_root.Mc1"/>
  <movieclip name="MovieClip2" instancename="_root.Mc1.subMc"/>
</movieclips>
Чтобы получить или задать переменные, выберите в выпадающем списке потоковый нод UI:Variable:Var или UI:Variable:Array.
Примечание:
Массивы представляют собой строки разделённые запятой.
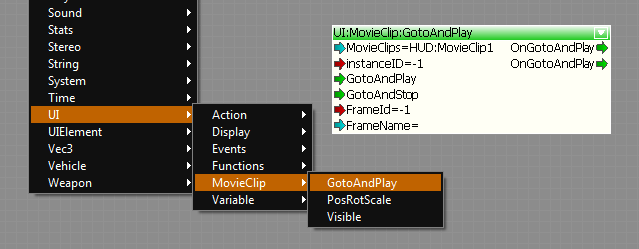
Вы также можете получить доступ к определённым мувиклипам через потоковые ноды.
Отображение/скрытие и настройка GFX-файлов
Чтобы отобразить или скрыть Flash-ассет используйте нод UI:Display:Display. Вы можете выбрать элемент в выпадающем списке.
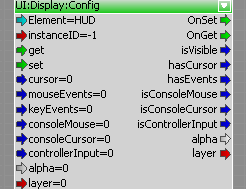
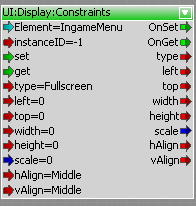
Чтобы настроить поведение и ограничения используйте ноды UI:Display:Config и UI:Display:Constraints соответственно.
Также можно инициализировать все эти настройки в XML-файле.
<UIElement name="HUD" mouseevents="1" keyevents="1" cursor="1" console_mouse="1" console_cursor="1">
  <GFx file="HUD.gfx" layer="1" alpha="0.5">
    <!-- режим выравнивание этого элемента -->
    <Constraints>
      <Align mode="fullscreen" />

      <!-- <Align mode="dynamic" halign="center" valign="center" scale="1" max="1" /> -->

      <!-- <Align mode="fixed" /> -->
      <!-- <Position top="20" left="20" width="200" height="200" /> -->

    </Constraints>
  </GFx>
  …
</UIElement>
Конфигурация
• mouseevents• cursor
• keyevents
• console_mouse
• console_cursor
• layer
• alpha
Ограничения
Доступно три режима размещения ассетов на экране:
• "fixed"• "dynamic"
Если scale равно 1, элемент будет максимально масштабирован, не деформируя пропорции. Если scale равно 0, Flash-ассет не будет масштабироваться.
Если max равно 1, то элемент будет максимизирован, так, что 100% экрана будут закрыты (это может привести к тому, что некоторые части элемента выйдут за экран) В противном случае асстер будет подогнан под экран, возможны некоторые незакрытые пространства слева/справа или сверху/снизу.
• "fullscreen"Экземпляры элементов
У каждого нода есть порт InstanceID. Благодаря этому идентификатору экземпляра, у вас может быть более одного экземпляра любого Flash-ассета. Порт InstanceID любого нода UI определяет, на какой экземпляр будет влиять этот нод. Если вы используете нод с новым идентификатором экземпляра, автоматически будет создан новый экземпляр этого Flash-ассета. Если вы использует -1 в качестве идентификатора экземпляра, нод будет влиять на все экземпляры этого Flash-элемента.
Полезные функции
Доступно несколько специальных функции ActionScript, которые автоматически вызываются системой UI.
Эти функции могут быть определены in the rootspace of your *ActionScript* and don’t need to be defined in the xml file.
Функции
Функции ActionScript
- cry_onSetup
- Если эта функция существует, она вызывается однократно когда GFX/SWF-файл загружен движком.
function cry_onSetup(_bIsConsole) // истинно если запущено на консоле, ложь если на ПК
- cry_onShow
- Если эта функция существует, она вызывается однократно когда GFX/SWF-файл показан.
function cry_onShow()
- cry_onHide
- Если эта функция существует, она вызывается однократно когда GFX/SWF-файл скрыт.
function cry_onHide()
- cry_onResize
- Если эта функция существует, она вызывается однократно когда разрешение движка изменено.
function cry_onResize(_intWidth, _intHeight)
- cry_onBack
- Если эта функция существует, она вызывается однократно, если игрок нажал кнопку Back на контроллере.
function cry_onBack()
- cry_requestHide
- Эта функция вызывается, если сработал порт RequestHide у нода UI:Display:Display (или через код/Lua). Может быть использовано для плавного исчезновения элемента.
function cry_requestHide()
FSCommand
Доступно несколько строк FSCommand, которые могут быть вызваны вашим ActionScript.
- cry_hideElement
- Если FSCommand выполнен с этой строкой, он укажет системе UI скрыть элемент.
fsCommand("cry_hideElement");
Пример
Плавное появление/исчезновение элемента UI.
// создаём функцию onEnterFrame для плавного появления корневого элемента (если показан элемент UI)
function cry_onShow()
{
   _root._alpha = 0;
   onEnterFrame = function()
   {
      if (_root._alpha < 100)
      {
         _root._alpha++;
      }
      else
      {
         // очищаем функцию onEnterFrame
         onEnterFrame = function() {};
      }
   }
}

// создаём функцию onEnterFrame для плавного исчезновения корневого элемента (если запрошено системой UI)
function cry_requestHide()
{
   onEnterFrame = function()
   {
      if (_root._alpha > 0)
      {
         _root._alpha--;
      }
      else
      {
         // очищаем функцию onEnterFrame и уведомляем систему UI, что этот элемент больше не надо отрисовывать.
         onEnterFrame = function() {};
         fscommand("cry_hideElement");
      }
   }
}
Теперь вы можете делать, чтобы элемент плавно появлялся/исчезал при срабатывании про show/requestHide у нода UI:Display:Display.
UI Flowgraphs
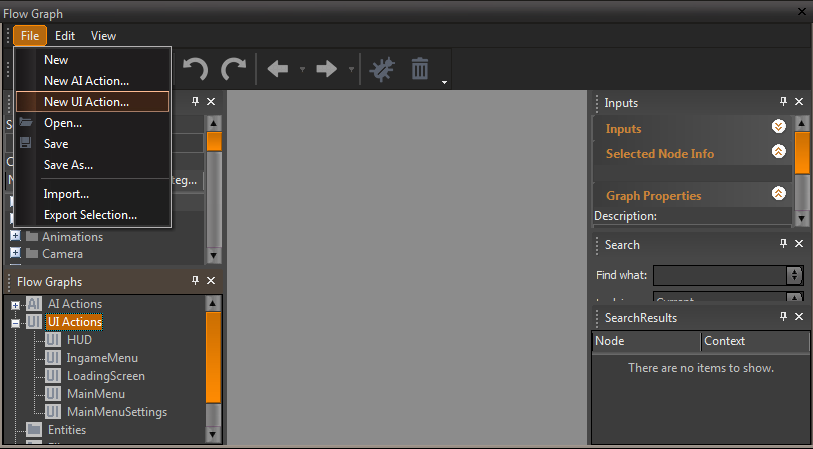
To create a new flowgraph for the UI just open the *Flowgraph* and choose “File->New UI Action…”.
All UI Actions are located in the *Flow Graphs* list and the xml files needs to be saved in Game/Libs/UI/UIActions.
- Note:* All UI actions are saved separate from the level. They need to be saved via File->Save in the flowgraph menu. *Make sure to save every time you did some changes\!*
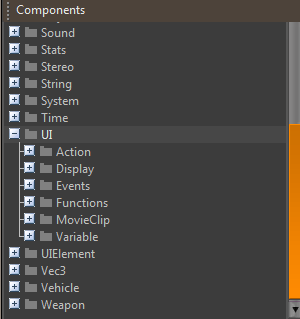
You find all flownodes for the UI in the component list unter UI.
Example
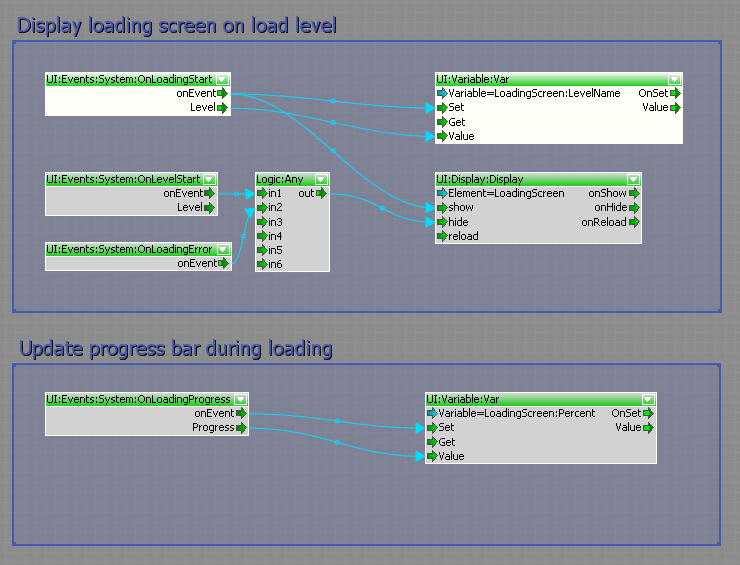
This example shows a simple flowgraph to show/hide a loading screen and setup the level name and a progress value.
The associated element is defined in Game/Libs/UI/UIElements/Menus.xml:
<UIElement name="LoadingScreen">

  <GFx file="LoadingScreen.gfx" layer="2" alpha="1" >
    <Constraints>
      <Align mode="fullscreen" />
    </Constraints>
  </GFx>

  <variables>
    <variable name="Percent" varname="LoadingPanel.Percent.text"/>
    <variable name="LevelName" varname="LoadingPanel.Level.text"/>
  </variables>

</UIElement>
UI Actions
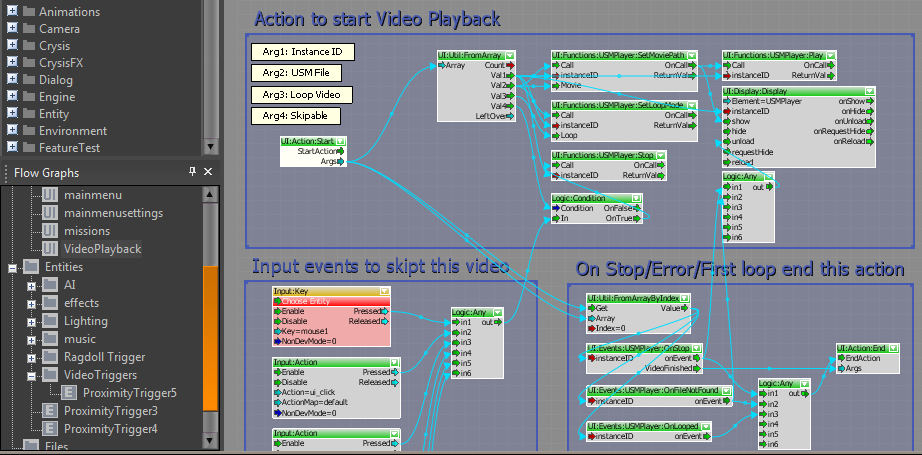
Sometimes it is helpful to trigger a complex UI Action several times without rebuilding the whole graph every time.
For this purpose it is possible to create UI Actions with a *“UI:Action:Start”* and *“*{*}UI:Action:End{*}*”* node. You will find this nodes under UI:Action.
The Name of the Flowgraph defines the Name of the Action.
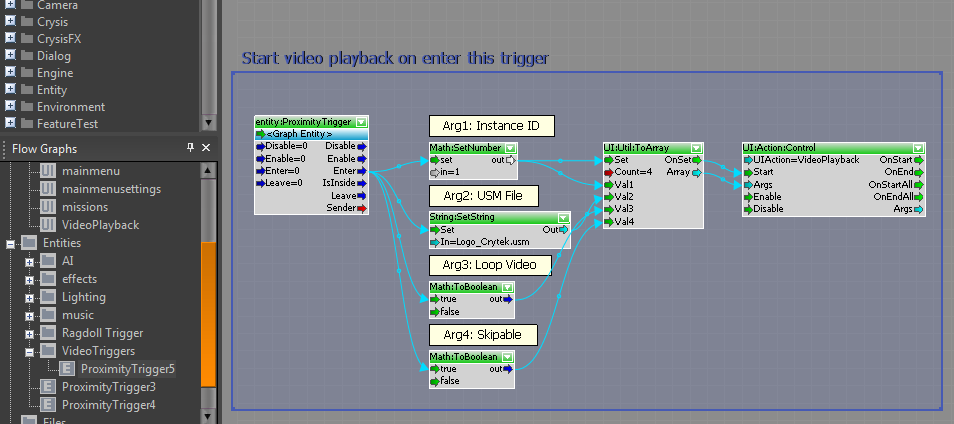
The *“*{*}UI:Action:Control{*}*”* node allows to start an UI Action and receive notifications if an action was started or stopped.
It is also possible to pass several arguments to an UIAction via the *“*{*}UI:Action:Control{*}*”* node.
As an example the UIAction to display a USM Video file:
This action can be used e.g. to play a movie on enter a proximity trigger:
- Note:* You can control any UI action from any flowgraph. If you disable an UI Action, the complete flowgraph will be disabled (not only the Nodes between the start and end node). It is also possible to use the *StartAction* and *EndAction* notes more than once per flowgraph. Every *StartAction* node will be triggered if the action is started and the first reached *EndAction* node will trigger the OnEnd port of any *UI:Action:Control* node which is listening to the flowgraph.
LUA and Flash UI System
It is also possible to control the UI System via LUA. [List of LUA functions|Flash UI LUA functions]
Example
// Display UI Element
UIAction.ShowElement("MyUIElement", 0);

// Call actionscript
UIAction.CallFunction("MyUIElement", 0, "Foo", "paramStr1", "paramStr2", 123, 12.3, false);

// set variable
UIAction.SetVariable("MyUIElement", 0, "MyVariable", 23);

// get variable
local var1 = UIAction.GetVariable("MyUIElement", 0, "MyVariable");
if (var1) then
    Log("Var1: %d", var1);
end

// set array
local newValues = {
    "val1",
    "val2",
    "val3",
};
UIAction.SetArray("MyUIElement", 0, "MyArray", newValues);

// get array
local values = UIAction.GetArray("MyUIElement", 0, "MyArray");
local value;
if (values) then
    for i,value in ipairs(values) do
        Log("Value: %s", value);
    end
end
Communication between C+\+ and UI flowgraph
You can just create your own custom flownodes and use them to trigger/receive UI functions/events. More information in the [Creating a New Flow Node] topic.
UI Event System
The UI System comes with an event system which can also used to communicate between C+\+ and the UI flowgraph.
The event system provides an easy way to define function and event nodes and handle them in C++.
Function nodes
Function nodes are available to all flowgraphs and provide an easy way to call C+\+ code.
Create a new .h file and name it *UIFunctions.h*
#ifndef __UIFunctions_H__
#define __UIFunctions_H__

#include <IFlashUI.h>

class CUIFunctions : public IUIEventListener
{
public:
    CUIFunctions();
    ~CUIFunctions();

    // IUIEventListener
    virtual void OnEvent( const SUIEvent& event );
    // ~IUIEventListener

private:
    SUIEventHelper<CUIFunctions> m_Dispatcher;
    IUIEventSystem* m_pGameEvents;

    void OnFoo( const SUIEvent& event );
    void OnBar( const SUIEvent& event );
};

#endif
Create a new .cpp file and name it *UIFunctions.cpp*
#include "StdAfx.h"
#include "UIFunctions.h"

CUIFunctions::CUIFunctions()
    : m_pGameEvents(NULL)
{
    if (gEnv->pFlashUI)
    {
        // create a new event system called "Game"
        // type is eEST_UI_TO_SYSTEM; nodes for this event system will be found unter UI:Functions
        // register as event listener to the event system
        m_pGameEvents = gEnv->pFlashUI->CreateEventSystem( "Game", IUIEventSystem::eEST_UI_TO_SYSTEM );
        m_pGameEvents->RegisterListener( this );

        // create a new function description for "Foo"
        SUIEventDesc fooDesc( "Foo", "Foo", "Call a function named foo" );
        // add a parameter description "Arg1" to the function description
        fooDesc.Params.push_back( SUIParameterDesc( "Arg1", "Arg1", "First Arg" ) );
        // register the function description to the dispatcher
        m_Dispatcher.RegisterEvent( m_pGameEvents, fooDesc, &CUIFunctions::OnFoo );


        // create another function description for "Bar"
        SUIEventDesc barDesc( "Bar", "Bar", "Call a function named bar" );
        barDesc.Params.push_back( SUIParameterDesc( "Arg1", "Arg1", "First Arg" ) );
        barDesc.Params.push_back( SUIParameterDesc( "Arg2", "Arg2", "Second Arg" ) );
        m_Dispatcher.RegisterEvent( m_pGameEvents, barDesc, &CUIFunctions::OnBar );
    }
}

CUIFunctions::~CUIFunctions()
{
    if ( m_pGameEvents )
        m_pGameEvents->UnregisterListener( this );
}

void CUIFunctions::OnEvent( const SUIEvent& event )
{
    // use the dispatcher to dipatch the event to the correct function
    m_Dispatcher.Dispatch( this, event );
}

void CUIFunctions::OnFoo( const SUIEvent& event )
{
    int arg1 = 0;

    if ( !event.args.GetArg(0, arg1) )
    {
        CryLogAlways("Foo: argument 1 has wrong type (should be int)");
        return;
    }

    // do something
}

void CUIFunctions::OnBar( const SUIEvent& event )
{
    bool arg1 = false;
    float arg2 = 0;

    if ( !event.args.GetArg(0, arg1) )
    {
        CryLogAlways("Foo: argument 1 has wrong type (should be bool)");
        return;
    }

    if ( !event.args.GetArg(1, arg2) )
    {
        CryLogAlways("Foo: argument 2 has wrong type (should be float)");
        return;
    }

    // do something
}
Open *Game.h*, forward declare your class and add a private member to CGame:
#ifndef __GAME_H__
#define __GAME_H__

...

class CUIFunctions;

...

class CGame :
public IGame, public IGameFrameworkListener, public ILevelSystemListener
{
    ...

private:
    ...

CUIFunctions * m_pUIFunctions;

    ...
}

...
Open *Game.cpp* init m_pUIFunctions with NULL in the construcor, delete m_pUIFunctions in the deconstructor and create the CUIFunction object at the end of the init function.
#include "StdAfx.h"
#include "Game.h"

...
#include "UIFunctions.h"

CGame::CGame()
    ...
{
    m_pUIFunctions = NULL;
}


CGame::~CGame()
{
    ...
    SAFE_DELETE(m_pUIFunctions);
}

...

bool CGame::Init(IGameFramework *pFramework)
{
    ...
    if (m_ pUIFunctions == NULL)
    {
        m_ pUIFunctions = new CUIFunctions();
    }
}
...
{*}Note:* It is important to create all your classes that uses the UI event system before CompleteInit is called.
This code will result in two new nodes *UI:Functions:Game:Foo* and *UI:Functions:Game:Bar*.
If the port “send” is triggered, it will call the C+\+ code in UIFunctions.cpp.
Event Nodes
Event nodes are very similar to Function nodes. They are used to send events from C+\+ to any UI flowgraph. e.g. you can create a singleton class to call events from everywhere of your code.
Create a .h file UIGameEvents.h
#ifndef __UIGameEvents_H__
#define __UIGameEvents_H__

#include <IFlashUI.h>

class CUIGameEvents
{
public:
    // access to instance
    static CUIGameEvents* GetInstance()
    {
        static CUIGameEvents inst;
        return &inst;
    }

    // init the game events
    void Init();

    // events
    enum EUIGameEvents
    {
        eUIGE_FooEvent,
        eUIGE_BarEvent,
    };
    void SendEvent( EUIGameEvents event, const SUIArguments& args );

private:
    CUIGameEvents() : m_pGameEvents(NULL) {};
    ~CUIGameEvents() {};

    IUIEventSystem* m_pGameEvents;
    std::map<EUIGameEvents, uint> m_EventMap;
};

#endif
Create a .cpp file UIGameEvents.cpp
#include "StdAfx.h"
#include "UIGameEvents.h"

void CUIGameEvents::Init()
{
    if (gEnv->pFlashUI)
    {
        // create a new event system called "Game"
        // type is eEST_SYSTEM_TO_UI; nodes for this event system will be found unter UI:Events
        m_pGameEvents = gEnv->pFlashUI->CreateEventSystem( "Game", IUIEventSystem::eEST_SYSTEM_TO_UI );

        // create a new event description for "Foo"
        SUIEventDesc fooDesc( "Foo", "Foo", "Event named foo" );
        // add a parameter description "Arg1" to the event description
        fooDesc.Params.push_back( SUIParameterDesc( "Arg1", "Arg1", "First Arg" ) );
        // register the event to the event system and associate the id with the event enum
        m_EventMap[ eUIGE_FooEvent ] = m_pGameEvents->RegisterEvent( fooDesc );

        // create another event description for "Bar"
        SUIEventDesc barDesc( "Bar", "Bar", "Event named bar" );
        barDesc.Params.push_back( SUIParameterDesc( "Arg1", "Arg1", "First Arg" ) );
        barDesc.Params.push_back( SUIParameterDesc( "Arg2", "Arg2", "Second Arg" ) );
        m_EventMap[ eUIGE_BarEvent ] = m_pGameEvents->RegisterEvent( barDesc );
    }
}

void CUIGameEvents::SendEvent( EUIGameEvents event, const SUIArguments& args )
{
    // send the event
    if (m_pGameEvents)
    {
        m_pGameEvents->SendEvent( SUIEvent(m_EventMap[event], args) );
    }
}
Open Game.cpp, include «UIGameEvents.h» and add to the end of the Init function:
bool CGame::Init(IGameFramework *pFramework)
{
    ...
    CUIGameEvents::GetInstance()->Init();
}
...
The code will create two nodes for the flowgraph:
Now you can call from everywhere in your code the SendEvent function to trigger e.g. the UI:Events:Game:Bar Node:
int arg1 = 12;
float arg2 = 1.4f;

SUIArguments args;
args.AddArgument( arg1 );
args.AddArgument( arg2 );

CUIGameEvents::GetInstance()->SendEvent( CUIGameEvents::eUIGE_BarEvent, args );

