Создание мини-карты
Материал из CryWiki Russia
Eis (Обсуждение | вклад) |
DCamer (Обсуждение | вклад) |
||
| Строка 1: | Строка 1: | ||
{{В_процессе_перевода}}<br> | {{В_процессе_перевода}}<br> | ||
| - | == | + | == Создание мини-карты == |
| - | === Введение === | + | === Введение === |
| - | В этом пошаговом руководстве описано создание миникарты с помощью | + | В этом пошаговом руководстве описано создание миникарты с помощью редактора Sandbox и программы Adobe Photoshop.<br> |
[[Image:Sandbox MiniMapTutorial image001.jpg]] | [[Image:Sandbox MiniMapTutorial image001.jpg]] | ||
| - | === Создание мини-карты === | + | === Создание мини-карты === |
| - | ==== Начало работы ==== | + | ==== Начало работы ==== |
| - | Для создания | + | Для создания мини-карты вам придётся редактировать файл '''MapScreenshotSettings.xml''' с помощью '''"Блокнота"'''. Этот файл находится в папке '''Editor'''. |
| - | Многие из этих параметров могут быть изменены для достижения желаемого результата , перед редактированием убедитесь что вы сделали резервную копию файла '''MapscreenshotSettings.xml''' . | + | Многие из этих параметров могут быть изменены для достижения желаемого результата, перед редактированием убедитесь что вы сделали резервную копию файла '''MapscreenshotSettings.xml''' . |
| - | + | <source lang="xml"><settings> | |
| + | <e_fog value="0" /> | ||
| + | <e_shadows value="0" /> | ||
| + | <r_PostProcessEffects value="0" /> | ||
| + | <r_HDRRendering value="0" /> | ||
| + | <e_detail_materials value="1" /> | ||
| + | <e_gsm_range_step value="20" /> | ||
| + | <e_gsm_lod_num value="3" /> | ||
| + | <e_gsm_range value="20" /> | ||
| + | <e_gsm_cache value="0" /> | ||
| + | <e_detail_materials_view_dist_z value="256" /> | ||
| + | <e_vegetation_sprites_distance_ratio value="4" /> | ||
| + | <e_shadows_cast_view_dist_ratio value="1" /> | ||
| + | <r_EyeAdaptationFactor value="0" /> | ||
| + | <r_EyeAdaptationBase value="1" /> | ||
| + | <r_HDRRendering value="1" /> | ||
| + | <e_lod_ratio value="4" /> | ||
| + | <e_clouds value="0" /> | ||
| + | <e_water_ocean value="1" /> | ||
| + | <e_particles value="0" /> | ||
| + | <e_view_dist_ratio value="800" /> | ||
| + | <e_hw_occlusion_culling_water value="0" /> | ||
| + | </settings></source> | ||
| - | ==== Шаг #1 ==== | + | ==== Шаг #1 ==== |
| - | Первое откройте свой уровень | + | Первое, откройте свой уровень для которого хотите создать мини-карту, в редакторе. |
| - | ==== Шаг #2 ==== | + | ==== Шаг #2 ==== |
| - | Затем мы откроем функции мини-карты; | + | Затем мы откроем функции мини-карты; они расположены в '''[[Sandbox RollUpBar|RollUpBar]]''', в панели '''Terrain'''. |
[[Image:Sandbox MiniMapTutorial image002.jpg]] | [[Image:Sandbox MiniMapTutorial image002.jpg]] | ||
| - | Теперь нажмём кнопку | + | Теперь нажмём кнопку '''Mini Map''', появится большой зелёный прямоугольник и маленький синии квадрат “выбора”, иногда он появляется в координатах карты 0,0,0.<br> [[Image:Sandbox MiniMapTutorial image003.jpg]] |
| - | + | Чтобы переместить ограничивающую рамку мини-карты, щелкните и удерживайте правую кнопку мыши, и переместите синий квадрат выбора к точке, где вы хотите создать вашу мини-карту. | |
| - | ==== Шаг #3 ==== | + | ==== Шаг #3 ==== |
| - | + | После перемещения квадрата, нажмите кнопку '''Use New Mini Map Area'''чтобы обновить ограничивающую рамку мини-карту, и переместить её в новое место. | |
| - | + | Зелёная ограничивающая рамка показывает область, которая будет превращена в мини-карту, отрегулируйте высоту камеры, изменив её размер. | |
| - | + | Вы можете отключить океан в настройках рендера ('''RollupBar→Render Settings''') чтобы увидеть зелёную ограничивающую рамку, если та часть карты находится под водой. Включите его после создания мини-карты. | |
| - | + | Отличным вариантом настройки высоты камеры ('''''Camera Height''''') является 20-50 метров над высотой ландшафта, так зелёная ограничивающая рамка, с легкостью расположиться вокруг синего квадрата. Вспомните о высоте вашего ландшафта, если зеленая рамка не отображается. | |
| - | + | Чтобы изменить высоту камеры ('''''Camera Height'''''), укажите предпочтительную высоту в поле ввода и нажмите '''Use New Mini Map Area'''. | |
| - | + | Регулировка '''Resolution (''разрешение'')''' в свойствах мини-карты увеличит размер конечного изображения, которое будет создано редактором, например, выбор разрешения 2048 даст изображения размером 2048x2048 пикселей. | |
[[Image:Sandbox MiniMapTutorial image004.gif]] | [[Image:Sandbox MiniMapTutorial image004.gif]] | ||
| - | ==== Шаг #4 ==== | + | ==== Шаг #4 ==== |
| - | + | Прежде, чем перейти к '''5 шагу''', убедитесь, что ограничивающая рамка миникарты, по размеру превосходит область игрового процесса вашей карты, чтобы игрок, стоя на границе вашей карты, не увидел срез на радаре. | |
| - | + | Это важный шаг и правило, которое следует помнить при создании мини-карты, для предотвращения необходимости повторного создания вашей мини-карты. | |
| - | ==== Шаг #5 ==== | + | ==== Шаг #5 ==== |
| - | + | Теперь, когда вы настроили '''высоту камеры,''' '''разрешение''' и область, убедитесь, что выбрана шестнадцатеричная или числовая '''высота камеры'''.<br> | |
| - | + | Теперь можете нажимать кнопку '''Generate [[Sandbox TerrainMinimap|MiniMap]]'''. | |
| - | + | Быстрая последовательность изображений начнет мигать в левом верхнем углу, показывая, что редактор создаёт вашу мини-карту, это может занять несколько минут в зависимости от настроек '''Camera Height''', '''Resolution''' <span style="font-weight: bold;">и</span><span style="font-weight: bold;"> </span>'''MapScreenshotSettings.xml''' . | |
| - | + | {{В_процессе_перевода|Обратите внимание, что вы должны выбирать очень большие разрешения, например, 8192 или 16384, если вы работаете в редакторе на очень мощной машине с не менее 8 Гб оперативной памяти.}} | |
| - | + | После того, как редактор завершит создание, ваша мини-карта будет помещена в папку '''Game\ScreenShots\Map''' с XML-файлом. | |
| - | + | XML предоставляет движку координаты карты, так, что позиция игрока будет корректно отображается на мини-карте. | |
| - | === | + | === Подготовка вашей мини-карты === |
==== Шаг #1 ==== | ==== Шаг #1 ==== | ||
| - | + | Откройте только что созданную мини-карту в '''Adobe Photoshop'''. | |
| - | + | Чтобы убедиться, что ваша мини-карта будет корректно отображаться в игре вам необходимо обесцветить изображение и настроить её уровни. | |
| - | ==== Шаг #2 ==== | + | ==== Шаг #2 ==== |
| - | + | Чтобы обесцветить ваша мини-карту, перейдите в '''Image→Adjustments→Desaturate''' ('''''Изображение→Коррекция→Обесцветить'''''), это действие сделает вашу мини-карту черно-белой. | |
| - | ==== Шаг #3 ==== | + | ==== Шаг #3 ==== |
| - | + | Теперь нам нужно настроить уровни, так как на вершине конечного изображения будет применяться наложение цвета, поэтому потребуется наличие несколько выдающихся черно-белых и ясных серых тонов, регулируйте уровни чтобы игроки смогли распознать больше деталей. | |
| - | + | Старайтесь избегать создание полностью черных областей. | |
| - | + | Чтобы начать, перейдите в '''Image→Adjustments→Levels '''('''''Изображение→Коррекция→Уровни'''''), появится диалоговое окно «Уровни».<br> [[Image:Sandbox MiniMapTutorial image005.jpg]] <br> Регулируя входные уровни ('''''Input Levels''''') вы можете создать контрастное изображение. | |
| - | ==== Шаг #4 ==== | + | ==== Шаг #4 ==== |
| - | + | Перейдите в '''File→Save As '''('''''Файл→Сохранить как...''''', появится окно сохранения, в свитке '''Format '''('''''Тип файлов''''') выберите '''CryTIFPlugin'''.<br> [[Image:Sandbox MiniMapTutorial image006.jpg]] <br> Нажмите '''Save '''('''''Сохранить'''''), теперь появится окно '''CryTIFPlugin''', которое имеет широкий спектр настроек и параметров, но нам необходимо использовать только некоторые из них. | |
| - | ==== Шаг #5 ==== | + | ==== Шаг #5 ==== |
| - | + | Первое, измените параметр '''Preset''' ('''''Предустановка''''') с стандартного значения ('''''Diffuse_highQ''''') <span style="font-weight: bold;">на</span><span style="font-weight: bold;"> </span>'''Minimap''' . <br> [[Image:Sandbox MiniMapTutorial image007.jpg]] <br> | |
| - | ==== Шаг #6 ==== | + | ==== Шаг #6 ==== |
| - | + | Перейдите на вкладку '''Advanced '''('''''Расширенные''''') и убедитесь что галочка с '''Auto Optimize file '''('''''Авто-оптимизация файла''''') снята. | |
[[Image:Sandbox MiniMapTutorial image008.jpg]] <br> You can now go ahead and press '''OK''' , '''crytifplugin''' will now go ahead and create a .TIF file. Don't worry about the end file size. The Resource Compiler will automatically create a .dds file for the target platform, specified in its settings. | [[Image:Sandbox MiniMapTutorial image008.jpg]] <br> You can now go ahead and press '''OK''' , '''crytifplugin''' will now go ahead and create a .TIF file. Don't worry about the end file size. The Resource Compiler will automatically create a .dds file for the target platform, specified in its settings. | ||
| Строка 105: | Строка 127: | ||
'''IMPORTANT''' '''you do not need the Cry Tif plugin for Photoshop to create a minimap.''' <br> '''Just use the .dds plugin from Nvidia to export the minimaps as DXT1 from Photoshop.''' | '''IMPORTANT''' '''you do not need the Cry Tif plugin for Photoshop to create a minimap.''' <br> '''Just use the .dds plugin from Nvidia to export the minimaps as DXT1 from Photoshop.''' | ||
| - | ==== Шаг #7 ==== | + | ==== Шаг #7 ==== |
The minimap is now ready to be used, select the .TIF file and the xml file that was created when you made your minimap and copy both files to your map folder. | The minimap is now ready to be used, select the .TIF file and the xml file that was created when you made your minimap and copy both files to your map folder. | ||
| - | If you already have an xml file located in your map folder, you can merely open it with '''notepad''' . | + | If you already have an xml file located in your map folder, you can merely open it with '''notepad'''. |
Inside the xml file you will need to edit the numbers in the first line that shows the '''startX''' , '''startY''' , '''endX''' and '''endY''' , exchange the numbers here with the numbers located in your minimap xml file.<br> [[Image:Sandbox MiniMapTutorial image009.jpg]] <br> | Inside the xml file you will need to edit the numbers in the first line that shows the '''startX''' , '''startY''' , '''endX''' and '''endY''' , exchange the numbers here with the numbers located in your minimap xml file.<br> [[Image:Sandbox MiniMapTutorial image009.jpg]] <br> | ||
| Строка 121: | Строка 143: | ||
The minimap is now visible in your map. | The minimap is now visible in your map. | ||
| - | === Adding detail to your minimap === | + | === Adding detail to your minimap === |
This process will require you to create several smaller pieces of your minimap and then later putting them together using Photoshop. | This process will require you to create several smaller pieces of your minimap and then later putting them together using Photoshop. | ||
| Строка 129: | Строка 151: | ||
Before starting, make sure that you've got the '''NVIDIA Texture Tools''' installed in Photoshop. ([http://developer.nvidia.com/object/dds_utilities_legacy.html http://developer.nvidia.com/object/dds_utilities_legacy.html]) | Before starting, make sure that you've got the '''NVIDIA Texture Tools''' installed in Photoshop. ([http://developer.nvidia.com/object/dds_utilities_legacy.html http://developer.nvidia.com/object/dds_utilities_legacy.html]) | ||
| - | ==== Шаг #1 ==== | + | ==== Шаг #1 ==== |
Now using Photoshop, open up your minimap .DDS file, the NVIDIA tools will recognize it and open up this property window, here you can just press '''OK''' . | Now using Photoshop, open up your minimap .DDS file, the NVIDIA tools will recognize it and open up this property window, here you can just press '''OK''' . | ||
| Строка 139: | Строка 161: | ||
[[Image:Sandbox MiniMapTutorial image012.jpg]] | [[Image:Sandbox MiniMapTutorial image012.jpg]] | ||
| - | ==== Шаг #2 ==== | + | ==== Шаг #2 ==== |
Go back to the Editor, and select the minimap function. | Go back to the Editor, and select the minimap function. | ||
| Строка 146: | Строка 168: | ||
You will also need to change the lines listed here below, in the '''MapScreenshotSettings.xml''' , these settings will raise the quality and amount of objects visible. | You will also need to change the lines listed here below, in the '''MapScreenshotSettings.xml''' , these settings will raise the quality and amount of objects visible. | ||
| + | <source lang="xml"><e_detail_materials value="100000" /> | ||
| + | <e_detail_materials_view_dist_z value="1000000" /> | ||
| + | <e_lod_ratio value="0" /> | ||
| + | <e_view_dist_ratio value="100000" /></source> | ||
| - | |||
After you've edited the '''MapScreenshotSettings.xml''' you can go ahead and press '''Generate [[Sandbox TerrainMinimap|MiniMap]]''' , this will again create a minimap image file and an xml file, the xml file you can safely delete as there's no need for it. | After you've edited the '''MapScreenshotSettings.xml''' you can go ahead and press '''Generate [[Sandbox TerrainMinimap|MiniMap]]''' , this will again create a minimap image file and an xml file, the xml file you can safely delete as there's no need for it. | ||
| - | ==== Шаг #3 ==== | + | ==== Шаг #3 ==== |
Now go back to Photoshop and open up the minimap file the editor just created. | Now go back to Photoshop and open up the minimap file the editor just created. | ||
| Строка 159: | Строка 184: | ||
Go to your minimap that you want to add detail to, under Edit>Paste and place in the copied image. | Go to your minimap that you want to add detail to, under Edit>Paste and place in the copied image. | ||
| - | ==== Шаг #4 ==== | + | ==== Шаг #4 ==== |
After you've done all that its time to resize the image you just pasted onto the minimap. | After you've done all that its time to resize the image you just pasted onto the minimap. | ||
| Строка 169: | Строка 194: | ||
<br> [[Image:Sandbox MiniMapTutorial image013.jpg]] | <br> [[Image:Sandbox MiniMapTutorial image013.jpg]] | ||
| - | ==== Шаг #5 ==== | + | ==== Шаг #5 ==== |
When you've successfully scaled your minimap piece to its correct size, you'll need to move it to its correct position on the original minimap, remember to double check if it really fits correctly. | When you've successfully scaled your minimap piece to its correct size, you'll need to move it to its correct position on the original minimap, remember to double check if it really fits correctly. | ||
Версия 19:35, 3 июня 2011
Содержание |
Создание мини-карты
Введение
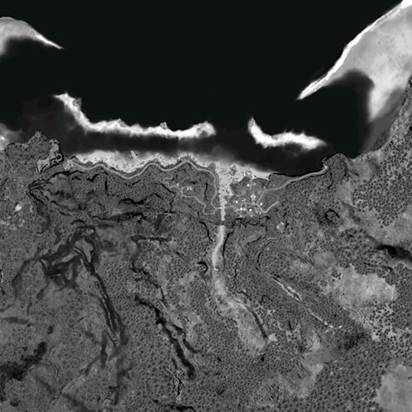
В этом пошаговом руководстве описано создание миникарты с помощью редактора Sandbox и программы Adobe Photoshop.
Создание мини-карты
Начало работы
Для создания мини-карты вам придётся редактировать файл MapScreenshotSettings.xml с помощью "Блокнота". Этот файл находится в папке Editor.
Многие из этих параметров могут быть изменены для достижения желаемого результата, перед редактированием убедитесь что вы сделали резервную копию файла MapscreenshotSettings.xml .
<settings>
<e_fog value="0" />
<e_shadows value="0" />
<r_PostProcessEffects value="0" />
<r_HDRRendering value="0" />
<e_detail_materials value="1" />
<e_gsm_range_step value="20" />
<e_gsm_lod_num value="3" />
<e_gsm_range value="20" />
<e_gsm_cache value="0" />
<e_detail_materials_view_dist_z value="256" />
<e_vegetation_sprites_distance_ratio value="4" />
<e_shadows_cast_view_dist_ratio value="1" />
<r_EyeAdaptationFactor value="0" />
<r_EyeAdaptationBase value="1" />
<r_HDRRendering value="1" />
<e_lod_ratio value="4" />
<e_clouds value="0" />
<e_water_ocean value="1" />
<e_particles value="0" />
<e_view_dist_ratio value="800" />
<e_hw_occlusion_culling_water value="0" />
</settings>
Шаг #1
Первое, откройте свой уровень для которого хотите создать мини-карту, в редакторе.
Шаг #2
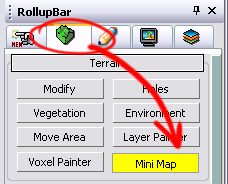
Затем мы откроем функции мини-карты; они расположены в RollUpBar, в панели Terrain.
Теперь нажмём кнопку Mini Map, появится большой зелёный прямоугольник и маленький синии квадрат “выбора”, иногда он появляется в координатах карты 0,0,0.
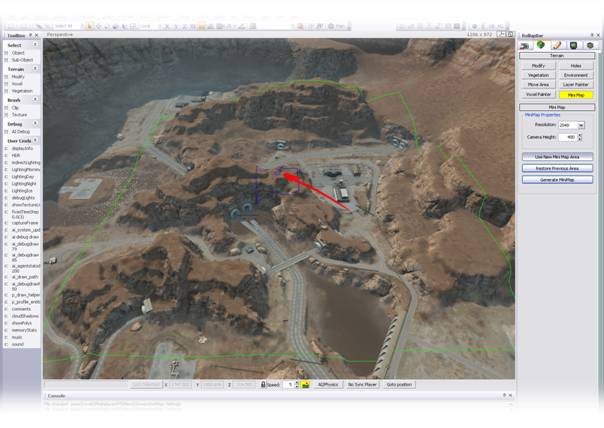
Чтобы переместить ограничивающую рамку мини-карты, щелкните и удерживайте правую кнопку мыши, и переместите синий квадрат выбора к точке, где вы хотите создать вашу мини-карту.
Шаг #3
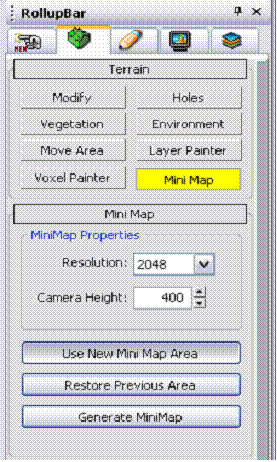
После перемещения квадрата, нажмите кнопку Use New Mini Map Areaчтобы обновить ограничивающую рамку мини-карту, и переместить её в новое место.
Зелёная ограничивающая рамка показывает область, которая будет превращена в мини-карту, отрегулируйте высоту камеры, изменив её размер.
Вы можете отключить океан в настройках рендера (RollupBar→Render Settings) чтобы увидеть зелёную ограничивающую рамку, если та часть карты находится под водой. Включите его после создания мини-карты.
Отличным вариантом настройки высоты камеры (Camera Height) является 20-50 метров над высотой ландшафта, так зелёная ограничивающая рамка, с легкостью расположиться вокруг синего квадрата. Вспомните о высоте вашего ландшафта, если зеленая рамка не отображается.
Чтобы изменить высоту камеры (Camera Height), укажите предпочтительную высоту в поле ввода и нажмите Use New Mini Map Area.
Регулировка Resolution (разрешение) в свойствах мини-карты увеличит размер конечного изображения, которое будет создано редактором, например, выбор разрешения 2048 даст изображения размером 2048x2048 пикселей.
Шаг #4
Прежде, чем перейти к 5 шагу, убедитесь, что ограничивающая рамка миникарты, по размеру превосходит область игрового процесса вашей карты, чтобы игрок, стоя на границе вашей карты, не увидел срез на радаре.
Это важный шаг и правило, которое следует помнить при создании мини-карты, для предотвращения необходимости повторного создания вашей мини-карты.
Шаг #5
Теперь, когда вы настроили высоту камеры, разрешение и область, убедитесь, что выбрана шестнадцатеричная или числовая высота камеры.
Теперь можете нажимать кнопку Generate MiniMap.
Быстрая последовательность изображений начнет мигать в левом верхнем углу, показывая, что редактор создаёт вашу мини-карту, это может занять несколько минут в зависимости от настроек Camera Height, Resolution и MapScreenshotSettings.xml .
После того, как редактор завершит создание, ваша мини-карта будет помещена в папку Game\ScreenShots\Map с XML-файлом.
XML предоставляет движку координаты карты, так, что позиция игрока будет корректно отображается на мини-карте.
Подготовка вашей мини-карты
Шаг #1
Откройте только что созданную мини-карту в Adobe Photoshop.
Чтобы убедиться, что ваша мини-карта будет корректно отображаться в игре вам необходимо обесцветить изображение и настроить её уровни.
Шаг #2
Чтобы обесцветить ваша мини-карту, перейдите в Image→Adjustments→Desaturate (Изображение→Коррекция→Обесцветить), это действие сделает вашу мини-карту черно-белой.
Шаг #3
Теперь нам нужно настроить уровни, так как на вершине конечного изображения будет применяться наложение цвета, поэтому потребуется наличие несколько выдающихся черно-белых и ясных серых тонов, регулируйте уровни чтобы игроки смогли распознать больше деталей.
Старайтесь избегать создание полностью черных областей.
Чтобы начать, перейдите в Image→Adjustments→Levels (Изображение→Коррекция→Уровни), появится диалоговое окно «Уровни».
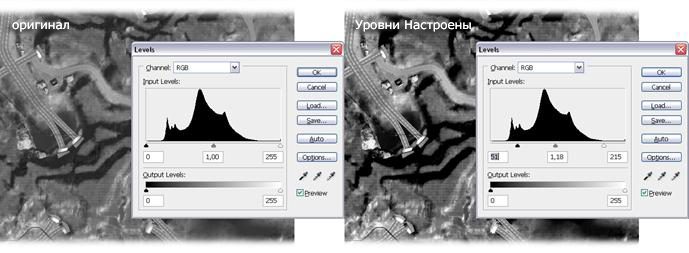
Регулируя входные уровни (Input Levels) вы можете создать контрастное изображение.
Шаг #4
Перейдите в File→Save As (Файл→Сохранить как..., появится окно сохранения, в свитке Format (Тип файлов) выберите CryTIFPlugin.
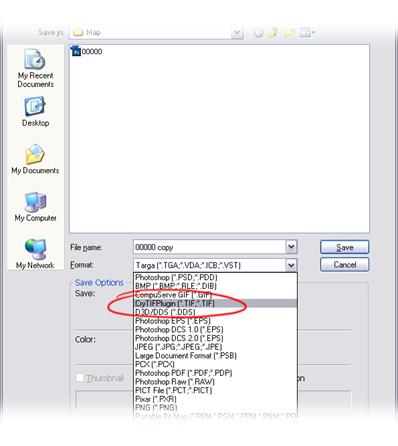
Нажмите Save (Сохранить), теперь появится окно CryTIFPlugin, которое имеет широкий спектр настроек и параметров, но нам необходимо использовать только некоторые из них.
Шаг #5
Первое, измените параметр Preset (Предустановка) с стандартного значения (Diffuse_highQ) на Minimap .
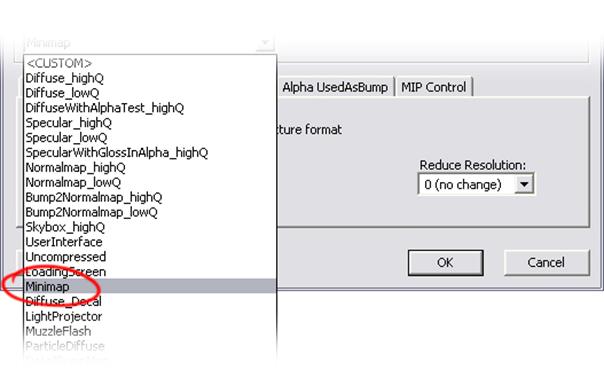
Шаг #6
Перейдите на вкладку Advanced (Расширенные) и убедитесь что галочка с Auto Optimize file (Авто-оптимизация файла) снята.
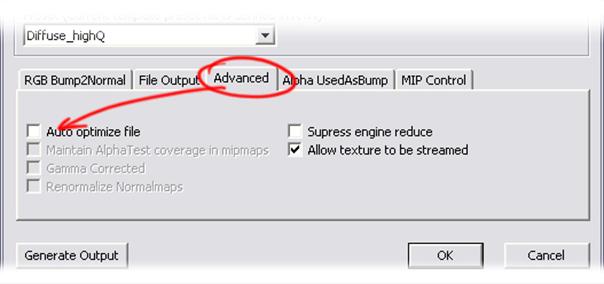
You can now go ahead and press OK , crytifplugin will now go ahead and create a .TIF file. Don't worry about the end file size. The Resource Compiler will automatically create a .dds file for the target platform, specified in its settings.
IMPORTANT you do not need the Cry Tif plugin for Photoshop to create a minimap.
Just use the .dds plugin from Nvidia to export the minimaps as DXT1 from Photoshop.
Шаг #7
The minimap is now ready to be used, select the .TIF file and the xml file that was created when you made your minimap and copy both files to your map folder.
If you already have an xml file located in your map folder, you can merely open it with notepad.
Inside the xml file you will need to edit the numbers in the first line that shows the startX , startY , endX and endY , exchange the numbers here with the numbers located in your minimap xml file.

Make sure that the MiniMap Filename points to the filename of your new minimap .dds image file.
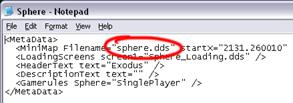
Instead of putting in .TIF as the file definition you will need to put in .dds instead (the one the Resource Compiler will create from the TIF, or you manually created via the NVIDIA plugin).
(Note if there is no numbers located in the xml file, just copy the whole line from your minimap xml file.)
The minimap is now visible in your map.
Adding detail to your minimap
This process will require you to create several smaller pieces of your minimap and then later putting them together using Photoshop.
This is mostly a process you will have to do if your pc is not able to handle the creation of high resolution minimaps.
Before starting, make sure that you've got the NVIDIA Texture Tools installed in Photoshop. (http://developer.nvidia.com/object/dds_utilities_legacy.html)
Шаг #1
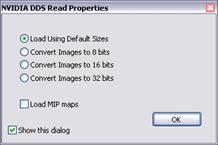
Now using Photoshop, open up your minimap .DDS file, the NVIDIA tools will recognize it and open up this property window, here you can just press OK .
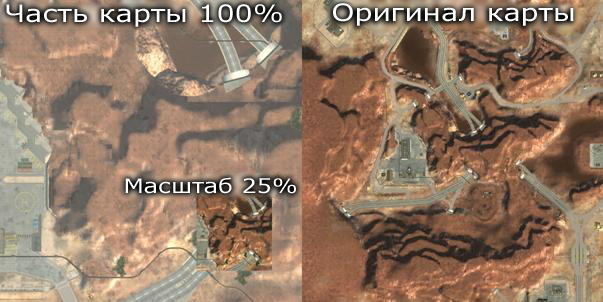
With the minimap opened you can see here on this example below that the quality at 100% is not the best. We'll change that.
Шаг #2
Go back to the Editor, and select the minimap function.
For higher quality it's enough to change Camera Height and keep the resolution to the original minimap, this is important otherwise you will run into issues with image sizes not matching.
You will also need to change the lines listed here below, in the MapScreenshotSettings.xml , these settings will raise the quality and amount of objects visible.
<e_detail_materials value="100000" />
<e_detail_materials_view_dist_z value="1000000" />
<e_lod_ratio value="0" />
<e_view_dist_ratio value="100000" />
After you've edited the MapScreenshotSettings.xml you can go ahead and press Generate MiniMap , this will again create a minimap image file and an xml file, the xml file you can safely delete as there's no need for it.
Шаг #3
Now go back to Photoshop and open up the minimap file the editor just created.
Select the whole image by going to Select>All and select copy under Edit>Copy.
Go to your minimap that you want to add detail to, under Edit>Paste and place in the copied image.
Шаг #4
After you've done all that its time to resize the image you just pasted onto the minimap.
This is where the calculator will come in handy for you, i.e. if your minimap was created with a Camera Height of 512 for example; you preferably generate the smaller minimaps in increments such as 256 or 128 etc.
If you for example generate smaller minimaps with 128, that'll need to be divided by 512 to calculate the scaling percentage (128/512 = 0.25, which equals to 25% scaling.)
Шаг #5
When you've successfully scaled your minimap piece to its correct size, you'll need to move it to its correct position on the original minimap, remember to double check if it really fits correctly.
Repeat steps 2 to 5 as many times as you want to ensure that your minimap has a high level of quality.
And that's it; with a little bit of extra work you will have a very high quality minimap.
