Создание мини-карты
Материал из CryWiki Russia
Содержание |
How to create minimaps
Overview
The following walkthrough gives you an overview on how to create minimaps using the Cryengine editor and Photoshop.
Creating a minimap
Getting started
To start off doing minimaps you will have to edit the MapScreenshotSettings.xml with Notepad. The file is located in the Editor folder.
A lot of these settings can be tweaked to create the most desirable result, also make sure to create a backup copy of the original MapscreenshotSettings.xml .
<settings>
<e_fog value="0" />
<e_shadows value="0" />
<r_PostProcessEffects value="0" />
<r_HDRRendering value="0" />
<e_detail_materials value="1" />
<e_gsm_range_step value="20" />
<e_gsm_lod_num value="3" />
<e_gsm_range value="20" />
<e_gsm_cache value="0" />
<e_detail_materials_view_dist_z value="256" />
<e_vegetation_sprites_distance_ratio value="4" />
<e_shadows_cast_view_dist_ratio value="1" />
<r_EyeAdaptationFactor value="0" />
<r_EyeAdaptationBase value="1" />
<r_HDRRendering value="1" />
<e_lod_ratio value="4" />
<e_clouds value="0" />
<e_water_ocean value="1" />
<e_particles value="0" />
<e_view_dist_ratio value="800" />
<e_hw_occlusion_culling_water value="0" />
</settings>
Step #1
First open up the desired level in the Editor that you want create a minimap for.
Step #2
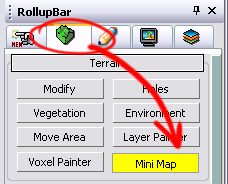
Next we'll open up the minimap function; this is located in the RollUpBar , in the Terrain pane.
Now when pressing the minimap button, a green bounding box, and a smaller blue “selection” box will appear on the terrain, this is sometimes at the 0,0,0 map coordinates.
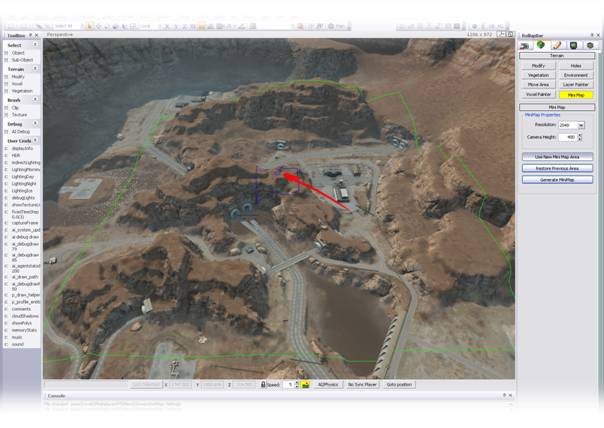
To move the minimap bounding box, click and hold the right mouse button and move the blue selection box to the spot where you want to create your minimap.
Step #3
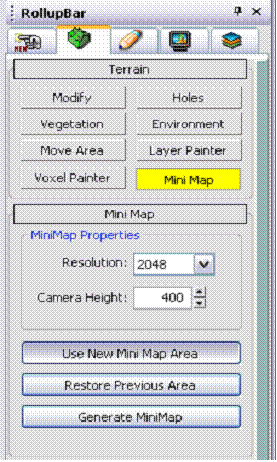
After you have moved the box, press the Use New Mini Map Area button to update the minimap bounding box to its new location.
The green bounding box shows the area that will be made into a minimap image, adjusting the camera height will therefore change the size of it.
You will have to disable 'ocean' in the render settings of the rollup bar to see the green bounding box if those parts of the map are underwater. Re-enable this before generating minimap.
It is good to set the 'Camera Height' 20-50 metres above the terrain height so the green bounding box is easily located around the blue square. Be aware of your terrain height if the green box does not show.
To change the Camera Height , put the preferred height into the input box and press Use New Mini Map Area.
Adjusting the Resolution in the minimap properties will increase the size of the minimap image that the Editor generates, for example choosing a resolution of 2048 will give you a minimap image of 2048x2048 pixels.
Step #4
Before going to step.5 , make sure that the minimap bounding box is actually bigger than the actual play area of your map, so that when a player stands on the border of your map he doesn't get cut off on the HUD radar.
This is an important step and rule to keep in mind when creating minimaps, to prevent having to redo your minimap.
Step #5
Now, when you';re all set and have selected your Camera Height , Resolution and area, be sure to select hexadecimal or even numbers for the Camera Height , if you know that you will add more detail to the minimap later on, i.e 256, 512, 1024, 2048 etc.
You can now go ahead and press the Generate MiniMap button.
A quick succession of images will flash in the upper left corner, showing that the editor is creating your minimap; this can take a few minutes depending on the Camera Height , Resolution and MapScreenshotSettings.xml .
_(Note though that you should only choose to use very large resolutions i.e. 8192 or 16384, if you are running the editor on a very high spec system with a minimum of 8 GB of ram)_
After the editor has finished, your minimap should be placed in Game\ScreenShots\Map along with the .XML file
The xml provides the engine with the map coordinates so that the player position is correctly displayed on the minimap.
Preparing your minimap
Step #1
In Photoshop open up the minimap image file that was just created.
To make sure that your minimap will display correctly in the game you will need to desaturate your image and tweak its levels.
Step #2
To desaturate your minimap image go to Image>Adjustments>Desaturate, this will essentially make your minimap black & white.
Step #3
Now we'll need to adjust the levels, as a color overlay will be applied on top of the final image, you will need to have some outstanding black and white’s and clear grey tones, the better the levels are adjusted the more details players will be able to recognize.
Try to avoid creating completely black areas.
To start off, go to Image>Adjustments>Levels, this will open up the “levels” output box.
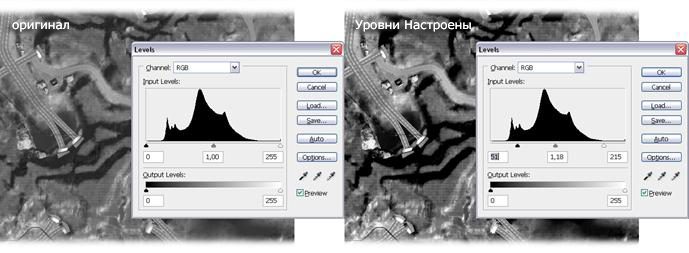
By adjusting the input levels you can create a well contrasted image.
Step #4
Now Go to File>Save As, this will open up the save as window, under formats choose the crytifplugin
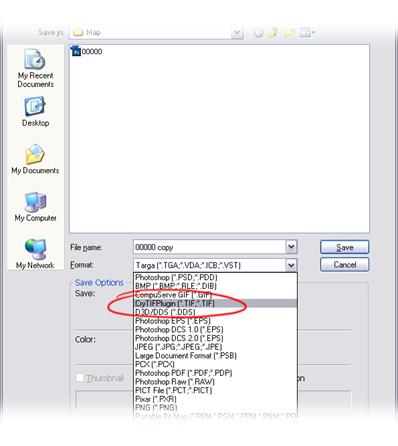
Go ahead and press save now as this will start the crytifplugin , which has a wide range of settings and options, but we only need to use a few.
Step #5
First, change the Preset option from its default (diffuse_highQ) to Minimap .
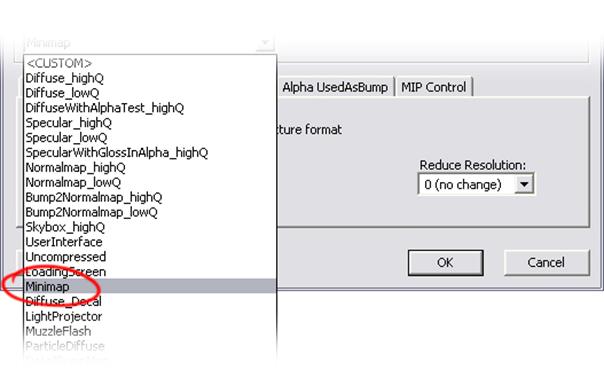
Step #6
Next go to the Advanced pane and check to make sure that Auto Optimize file is unchecked.
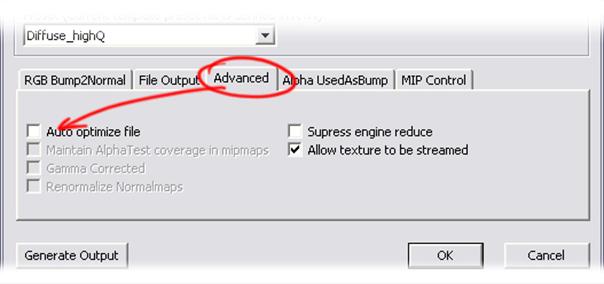
You can now go ahead and press OK , crytifplugin will now go ahead and create a .TIF file. Don't worry about the end file size. The Resource Compiler will automatically create a .dds file for the target platform, specified in its settings.
IMPORTANT you do not need the Cry Tif plugin for Photoshop to create a minimap.
Just use the .dds plugin from Nvidia to export the minimaps as DXT1 from Photoshop.
Step #7
The minimap is now ready to be used, select the .TIF file and the xml file that was created when you made your minimap and copy both files to your map folder.
If you already have an xml file located in your map folder, you can merely open it with notepad .
Inside the xml file you will need to edit the numbers in the first line that shows the startX , startY , endX and endY , exchange the numbers here with the numbers located in your minimap xml file.

Make sure that the MiniMap Filename points to the filename of your new minimap .dds image file.
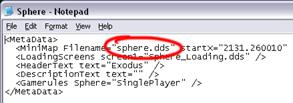
Instead of putting in .TIF as the file definition you will need to put in .dds instead (the one the Resource Compiler will create from the TIF, or you manually created via the NVIDIA plugin).
(Note if there is no numbers located in the xml file, just copy the whole line from your minimap xml file.)
The minimap is now visible in your map.
Adding detail to your minimap
This process will require you to create several smaller pieces of your minimap and then later putting them together using Photoshop.
This is mostly a process you will have to do if your pc is not able to handle the creation of high resolution minimaps.
Before starting, make sure that you've got the NVIDIA Texture Tools installed in Photoshop. (http://developer.nvidia.com/object/dds_utilities_legacy.html)
Step #1
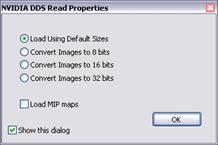
Now using Photoshop, open up your minimap .DDS file, the NVIDIA tools will recognize it and open up this property window, here you can just press OK .
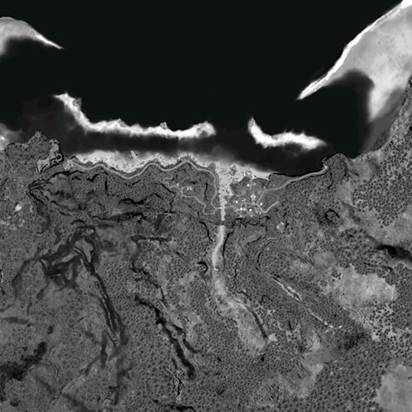
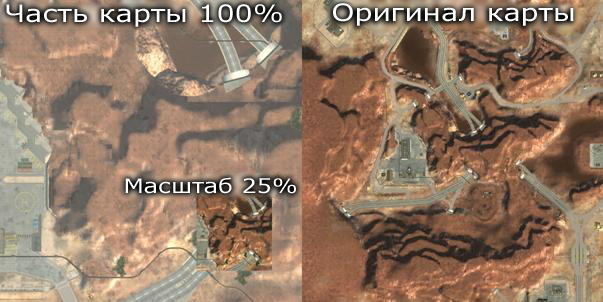
With the minimap opened you can see here on this example below that the quality at 100% is not the best. We'll change that.
Step #2
Go back to the Editor, and select the minimap function.
For higher quality it's enough to change Camera Height and keep the resolution to the original minimap, this is important otherwise you will run into issues with image sizes not matching.
You will also need to change the lines listed here below, in the MapScreenshotSettings.xml , these settings will raise the quality and amount of objects visible.
<e_detail_materials value="100000" /> <e_detail_materials_view_dist_z value="1000000" /> <e_lod_ratio value="0" /> <e_view_dist_ratio value="100000" />
After you've edited the MapScreenshotSettings.xml you can go ahead and press Generate MiniMap , this will again create a minimap image file and an xml file, the xml file you can safely delete as there's no need for it.
Step #3
Now go back to Photoshop and open up the minimap file the editor just created.
Select the whole image by going to Select>All and select copy under Edit>Copy.
Go to your minimap that you want to add detail to, under Edit>Paste and place in the copied image.
Step #4
After you've done all that its time to resize the image you just pasted onto the minimap.
This is where the calculator will come in handy for you, i.e. if your minimap was created with a Camera Height of 512 for example; you preferably generate the smaller minimaps in increments such as 256 or 128 etc.
If you for example generate smaller minimaps with 128, that'll need to be divided by 512 to calculate the scaling percentage (128/512 = 0.25, which equals to 25% scaling.)
Step #5
When you've successfully scaled your minimap piece to its correct size, you'll need to move it to its correct position on the original minimap, remember to double check if it really fits correctly.
Repeat steps 2 to 5 as many times as you want to ensure that your minimap has a high level of quality.
And that's it; with a little bit of extra work you will have a very high quality minimap.
