Создание Flowgraph
Материал из CryWiki Russia
DCamer (Обсуждение | вклад) (Новая страница: «{{О уроке |автор=vloktboky |редакторы=jameszhao00, McGinge, |обновлен=15 января 2008 |совместимость=Оригинал |...») |
DCamer (Обсуждение | вклад) |
||
| Строка 89: | Строка 89: | ||
| - | [[Категория: | + | [[Категория:Приступая к работе]][[Категория:Flowgraph]] |
Версия 10:39, 24 декабря 2010
|
|
The next step after creating a map is creating dynamic behaviour, or actions and events in the game. To do this, we can use the flowgraph tool; this is in effect a easy-to-learn simplistic but infinitely powerful scripting tool that can be used to set up all kinds of behaviours, events and actions in game.
In this tutorial, in order to master some of the basics of the flowgraph, you will learn how to give a weapon to the player when the player is near to an object using the Flowgraph.
Содержание |
Prerequisites
Creating a Trigger
Шаблон:Step This entity will be used to trigger our flowgraph. To spawn a ProximityTrigger, go to Rollup Bar > Create > Entity > Triggers > Proximity Trigger.
Шаблон:Step
Файл:Create button.png
After creating and naming the flowgraph, the Flow Graph Editor will pop up. You will notice that the name you gave your flowgraph is now listed below the name of your Proximity Trigger on the left-hand side of the screen in the Flow Graphs window.
Файл:Editor window overview.png
A brief description of each window:
- Components
- Here you will find a list of all the available Nodes you can use in your Graphs.
- Flow Graphs
- Here you will find a list of all Graphs contained in your level.
- Entity
- Here you will be able to adjust the values of the Input ports for the selected Node. You can also view the description of the selected Node, or adjust the properties of the Graph.
- Search
- Here you can quickly search through your graphs for different criteria.
- Search Results
- Here you can find the results of your searches.
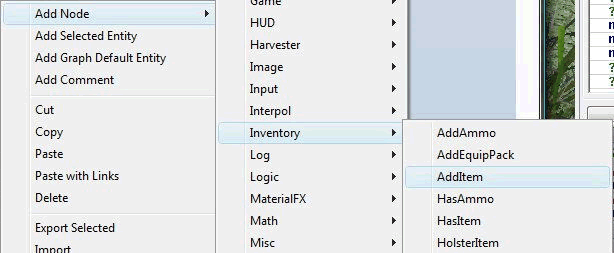
Creating a Flowgraph Node
There are two ways to create a Node in your graph. By right-clicking anywhere in the checkboard window, you can:
- Select the «Add Graph Default Entity» option to create a node that represents the graph’s default entity.
- Select the «Add Selected Entity» option to create a node that represents the currently-selected entity in the Editor.
A tiny black spot will appear near where you right-clicked in the checkboard window. Don’t worry, you didn’t burn a pixel out in your LCD. That is actually the Node you just created. It’s not small; you’re just zoomed out really, really far!
Шаблон:Step Eventually, the window will come into view and you will be able to make out what it is.
The arrows on the node represent ports. The ones on the left are your Input or «Coming In» ports. The ones on the right are your Output or «Going out» ports. The basic rule of thumb is:
- You signal or call an Input Port.
- The Node will execute some sort of logic.
- The result of the execution will trigger one or more Output Ports.
- You connect the Output Port to another node’s Input Port to signal it.
What we are did here is give the player a Shotgun when they walk into our Proximity Trigger. So we dropped a node that will let us adjust the player’s Inventory.
Adjusting Input Values
Шаблон:Step Файл:Adjust input values.png
This tells the Inventory:AddItem node what weapon we wanted to give to the player. Values in the Inputs window represent the values for the respective Input Port. Almost all Nodes have Input values that let you alter how the Node works. To adjust them is always the same: find them in the Inputs window, and type in or select the value you wish to use.
Creating Links
Once the value has been selected, all we need to do is signal the Inventory:AddItem Node’s add Input Port to give the player the shotgun! We will signal this port from the Proximity Trigger’s Enter Output Port.
Шаблон:Step Файл:Click drag release.png
You should see a curvy line with an arrow connecting the two ports.
Файл:Click drag release result.png
Conclusion
That’s it! You just defined your first Link. To recap, your Graph now has two Nodes: one for the Proximity Trigger in your world, and one that lets you add items to the player’s Inventory. You defined a Link connecting the Proximity Trigger Node’s Enter Input Port to the Inventory:AddItem Node’s add Output Port.
When you walk into the Proximity Trigger in the game, you will be given a shotgun! Try it out, and continue experimenting! There are more things the Flow Graph Editor is capable of doing that were not mentioned in this tutorial.

