Экспорт текстуры из Photoshop с помощью плагина CryTIF
Материал из CryWiki Russia
DCamer (Обсуждение | вклад) |
DCamer (Обсуждение | вклад) |
||
| Строка 8: | Строка 8: | ||
==== Подготовка ==== | ==== Подготовка ==== | ||
| + | |||
===== Установка плагина ===== | ===== Установка плагина ===== | ||
| Строка 23: | Строка 24: | ||
Текстуры для CryEngine всегда должны иметь равный размер в обоих направлениях, что соответствуют схеме второй степени: 2, 4, 8, 16, 32, 64, 128, 256, 512,… пикселей. | Текстуры для CryEngine всегда должны иметь равный размер в обоих направлениях, что соответствуют схеме второй степени: 2, 4, 8, 16, 32, 64, 128, 256, 512,… пикселей. | ||
| - | [[ | + | [[Файл:Sandbox_CrytifExporting_image001.jpg]] |
Select a picture of your choice, we have selected a picture of an elegant and classic German car, and resize it to 512 x 512 pixels. Choose '''FileSave''' to create a copy on the hard drive. | Select a picture of your choice, we have selected a picture of an elegant and classic German car, and resize it to 512 x 512 pixels. Choose '''FileSave''' to create a copy on the hard drive. | ||
When the file requester shows up, choose '''CryTIF''' as the format: | When the file requester shows up, choose '''CryTIF''' as the format: | ||
| - | [[ | + | [[Файл:Sandbox_CrytifExporting_image002.jpg]] |
This opens up the CryTIF Exporter Control Window. | This opens up the CryTIF Exporter Control Window. | ||
| Строка 34: | Строка 35: | ||
===== CryTIF Exporter Control Window ===== | ===== CryTIF Exporter Control Window ===== | ||
| - | [[ | + | [[Файл:Sandbox_CrytifExporting_image003.jpg]] |
| - | The left side shows the original, uncompressed file and the right side shows a preview of the file in the output format. | + | The left side shows the original, uncompressed file and the right side shows a preview of the file in the output format. |
As we are about to save a texture for the diffuse channel, choose '''Diffuse_highQ''' in the '''Preset Settings'''. | As we are about to save a texture for the diffuse channel, choose '''Diffuse_highQ''' in the '''Preset Settings'''. | ||
This will create a DXT1 dds file later on, which needs about 170KB , instead of 1024 KB as an uncompressed texture. Compare the original quality and the quality in the preview window on the right side. Position the mouse pointer over one of the two previews and use the mouse wheel to zoom in and out of the pictures simultaneously. | This will create a DXT1 dds file later on, which needs about 170KB , instead of 1024 KB as an uncompressed texture. Compare the original quality and the quality in the preview window on the right side. Position the mouse pointer over one of the two previews and use the mouse wheel to zoom in and out of the pictures simultaneously. | ||
| - | [[ | + | [[Файл:Sandbox_CrytifExporting_image004.jpg]] |
Play around with the presets to get a feeling for the formats the exporter is able to output data. | Play around with the presets to get a feeling for the formats the exporter is able to output data. | ||
| - | We stick for this example with Diffuse_highQ. | + | We stick for this example with Diffuse_highQ. |
The lower part of the interface features Tabs. | The lower part of the interface features Tabs. | ||
| Строка 52: | Строка 53: | ||
The File Output tab features the basic settings for the texture export. | The File Output tab features the basic settings for the texture export. | ||
| - | '''[[ | + | '''[[Файл:Sandbox_CrytifExporting_image005.jpg]] ''' |
We keep the settings for Reduce Resolution at 0 as we do not want the texture to be scaled down on both axis by default. | We keep the settings for Reduce Resolution at 0 as we do not want the texture to be scaled down on both axis by default. | ||
Use this feature to scale down big source files automatically. | Use this feature to scale down big source files automatically. | ||
| Строка 61: | Строка 62: | ||
The Advanced tab features some optimization and exception functionality. | The Advanced tab features some optimization and exception functionality. | ||
| - | [[ | + | [[Файл:Sandbox_CrytifExporting_image006.jpg]] |
Auto optimize should be kept turned on for normal textures. | Auto optimize should be kept turned on for normal textures. | ||
| - | Only on very high spec this setting is disregarded. | + | Only on very high spec this setting is disregarded. |
It automatically scales all textures over 512 pixels width or height. | It automatically scales all textures over 512 pixels width or height. | ||
This was implemented to improve performance and optimize memory consumption. In most of the cases the difference between the 1024 pixel and 512 pixel version is a good trade off for better performance. | This was implemented to improve performance and optimize memory consumption. In most of the cases the difference between the 1024 pixel and 512 pixel version is a good trade off for better performance. | ||
| Строка 75: | Строка 76: | ||
Press '''OK''' when you are done. | Press '''OK''' when you are done. | ||
| - | This saves the Texture as a modified TIF file. | + | This saves the Texture as a modified TIF file. |
It is now ready to be used in the Cryengine2 Sandbox Editor or in a MOD. | It is now ready to be used in the Cryengine2 Sandbox Editor or in a MOD. | ||
| Строка 84: | Строка 85: | ||
The big advantages will become apparent for teams who want to create a mod and share data – you only need to take care of the uncompressed source files (TIF and PSD), the dds will be created when you load assets into the editor. | The big advantages will become apparent for teams who want to create a mod and share data – you only need to take care of the uncompressed source files (TIF and PSD), the dds will be created when you load assets into the editor. | ||
| - | When you switch to a lower config Spec because you want to test if the performance of your mod is texture memory bound, you want to have the textures scaled down by the factor 2. This is not possible with pure . | + | When you switch to a lower config Spec because you want to test if the performance of your mod is texture memory bound, you want to have the textures scaled down by the factor 2. This is not possible with pure .dds — only with the CryTIF files. |
| - | [[ | + | [[Категория:Official:Basic - Object Setup]] |
== See Also == | == See Also == | ||
Версия 12:46, 4 апреля 2011
Содержание |
Экспорт текстуры из Photoshop с помощью плагина CryTIF
Описание
Следующее руководство опишет процесс установки плагина, для полного использования особенностей текстур в CryEngine и опишет процесс его использования в повседневном производстве. Этот плагин добавляет метаданные в не сжатые исходные файлы и передаёт их в CryEngine 2 Resource Compiler (сокращенно RC) для последующего преобразования в формат DDS или в карту нормалей.
Переход к работе
Подготовка
Установка плагина
Программа установки должна автоматически установить плагины. Если по каким-то причинам плагин не может быть установлен автоматически, следуйте инструкциям ниже:
- Скопируйте следующие файлы в корневой каталог Photoshop:
«Bin32/zlib1.dll»
«Bin32/jpeg62.dll»
«Bin32/libtiff3.dll» - Скопируйте файл «Tools/CryTIFPlugin.8bi» в папку «Photoshop/Plugins»
- В Photoshop, вы можете изменить путь RC, выбрав «Help->About->Plugins->CryTIFPlugin».
При этом, появится окно с параметрами компилятора ресурсов. В нём вы можете установить правильный путь к корню установки CryENGINE 2. Это приведет к ошибке → попробуйте сохранить еще раз. Теперь появится диалоговое окно CryTIFF.
Экспорт текстуры
Текстуры для CryEngine всегда должны иметь равный размер в обоих направлениях, что соответствуют схеме второй степени: 2, 4, 8, 16, 32, 64, 128, 256, 512,… пикселей.
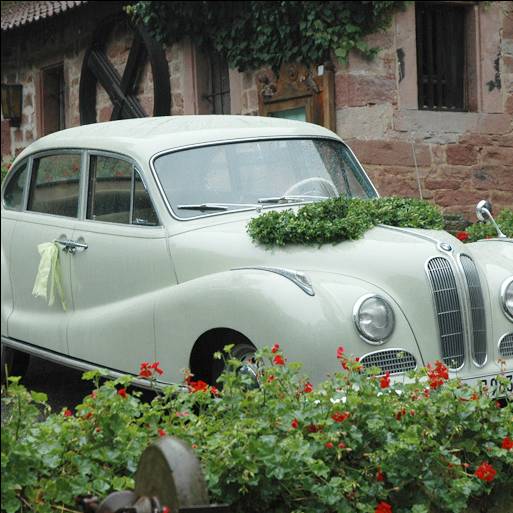
Select a picture of your choice, we have selected a picture of an elegant and classic German car, and resize it to 512 x 512 pixels. Choose FileSave to create a copy on the hard drive. When the file requester shows up, choose CryTIF as the format:
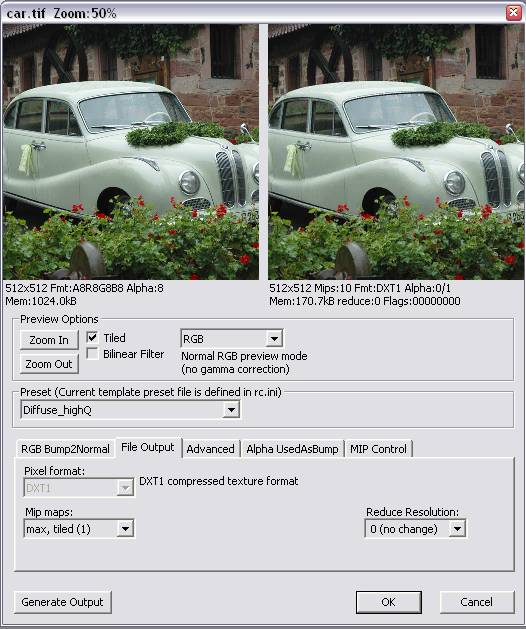
This opens up the CryTIF Exporter Control Window.
CryTIF Exporter Control Window
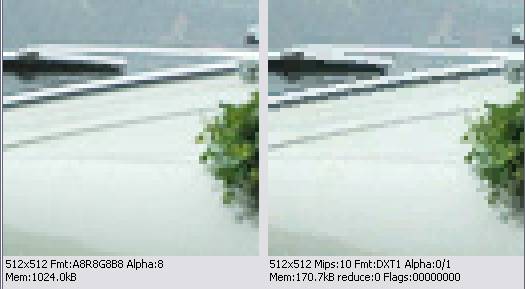
The left side shows the original, uncompressed file and the right side shows a preview of the file in the output format. As we are about to save a texture for the diffuse channel, choose Diffuse_highQ in the Preset Settings. This will create a DXT1 dds file later on, which needs about 170KB , instead of 1024 KB as an uncompressed texture. Compare the original quality and the quality in the preview window on the right side. Position the mouse pointer over one of the two previews and use the mouse wheel to zoom in and out of the pictures simultaneously.
Play around with the presets to get a feeling for the formats the exporter is able to output data. We stick for this example with Diffuse_highQ.
The lower part of the interface features Tabs. The most important ones, the ones you will check on every texture, are File Output and Advanced.
File Output Tab
The File Output tab features the basic settings for the texture export.
 We keep the settings for Reduce Resolution at 0 as we do not want the texture to be scaled down on both axis by default.
Use this feature to scale down big source files automatically.
We also want to create MipMaps for the texture and keep the settings to max.
Advanced Tab
The Advanced tab features some optimization and exception functionality.
Auto optimize should be kept turned on for normal textures. Only on very high spec this setting is disregarded. It automatically scales all textures over 512 pixels width or height. This was implemented to improve performance and optimize memory consumption. In most of the cases the difference between the 1024 pixel and 512 pixel version is a good trade off for better performance.
Keep the Supress engine reduce off. If you switch from High to lowspec, the textures are scaled down automatically to allow them to be loaded into the graphics card memory. This flag overwrites all the RC settings and keeps the original size throughout all the different quality settings. You want to use this on textures featuring text.
You want the texture to be streamed – in case of effects you might turn it off to make sure, explosions are displayed without any delay, caused by loading textures.
Press OK when you are done. This saves the Texture as a modified TIF file. It is now ready to be used in the Cryengine2 Sandbox Editor or in a MOD.
Result
You can select the texture in the material editor with in Cryengine2 Sandbox as a TIF or as a dds – there is no difference. You could bypass the CryTIF plugin completely, and create your dds files without it. But this is not recommended and when support questions arise, you will be asked to do the same procedure with the CryTIF plugin.
The big advantages will become apparent for teams who want to create a mod and share data – you only need to take care of the uncompressed source files (TIF and PSD), the dds will be created when you load assets into the editor. When you switch to a lower config Spec because you want to test if the performance of your mod is texture memory bound, you want to have the textures scaled down by the factor 2. This is not possible with pure .dds — only with the CryTIF files.


